Hello and welcome to this tutorial series, my name is Henry and I will be taking you through the various aspect of creating a simple blog system using Laravel web framework. In part VI we were able to store a blog post in our database. In this lesson, we are going to add the ability to upload an image when creating our post.
The first step to upload our image is to update our storePost method in our HomeController. Open HomeController and make sure it has the following code:
<?php

namespace App\Http\Controllers;

use App\Blog;
use App\User;
use Illuminate\Http\Request;
use Illuminate\Support\Facades\Auth;

class HomeController extends Controller
{
    /**
     * Create a new controller instance.
     *
     * @return void
     */
    public function __construct()
    {
        $this->middleware('auth');
    }

    /**
     * Show the application dashboard.
     *
     * @return \Illuminate\Contracts\Support\Renderable
     */
    public function index()
    {
        return view('home');
    }

    public function getRegisteredUsers()
    {
        $users = User::orderBy('id', 'DESC')->get();
        return view('users', ['users' => $users]);
    }


    /**
     * A function to show a list of all blog posts
     */

    public function PostList()
    {
        $posts = Blog::with('writer')->get();
//        dd($posts);
        return view('post_list', ['posts' => $posts]);
    }


    /**
     * A function to show a form to create post
     */

    public function createPost()
    {
        return view('post_create');
    }


    /**
     * A function to store our post
     */

    public function storePost(Request $request)
    {
        $request->validate([
                'title' => 'required',
                'body' => 'required',
                'image' => 'required|image|mimes:jpeg,png,jpg,gif,svg|max:2048',
            ]
        );

        $image = $request->file('image');
        $input['imagename'] = time().'.'.$image->getClientOriginalExtension();
        $destinationPath = public_path('/images');
        $image->move($destinationPath, $input['imagename']);

        $article = new Blog();
        $article->title = $request->get('title');
        $article->body = $request->get('body');
        $article->author = Auth::id();
        $article->image = $input['imagename'];
        $article->save();
        return redirect()->route('all_posts')->with('status', 'New article has been successfully created!');
    }

}
Let’s understand the code:
- Line 70 – we have created our image validation which is required, and also the type of the image e.g. jpeg, png etc.
- Line 74 – we create a variable called image which we assign the image file from our request.
- Line 75 – we define a variable which will store the name of our image, to make each image unique we concatenate with time.
- Line 76 – we define a folder in our public folder where our uploaded image will be stored.
- Line 77 – we move our uploaded image to the public/images folder.
- Line 83 – we save the name of our image in the database field called image.
The next step is to edit our post creating form, open post_create.blade.php file and make sure it has the following code:
@extends('layouts.app')

@section('content')
    <div class="container-fluid">
        <div class="row">
            @include('partials.sidenavbar')

            <main role="main" class="col-md-9 ml-sm-auto col-lg-10 px-4">
                <div class="d-flex justify-content-between flex-wrap flex-md-nowrap align-items-center pt-3 pb-2 mb-3 border-bottom">
                    <h1 class="h2">Create A Post</h1>
                </div>


                    <form action="{{ route('store_new_post') }}" method="post" enctype="multipart/form-data">
                        {{ csrf_field() }}
                        <div class="form-group">
                            <label for="title">Title</label>
                            <input type="text" class="form-control"  aria-describedby="emailHelp" placeholder="Enter blog title" name="title" required>
                        </div>
                        <div class="form-group">
                            <label for="body">Blog Content</label>
                            <textarea class="form-control" rows="5" name="body" required></textarea>
                        </div>
                        <div class="form-group">
                            <label for="exampleFormControlFile1">Feature Image</label>
                            <input type="file" class="form-control-file" id="exampleFormControlFile1" name="image" required>
                        </div>
                        <button type="submit" class="btn btn-primary">Create Post</button>
                    </form>

            </main>
        </div>
    </div>
@endsection
Let’s the code:
- Line 14 – we have added an attribute called enctype to enable our form to deal with file. Every time you want to upload file, your form must have enctype.
- Line 24 to 27 – we define a section where our user will be able to select image.
- Line 26 – we define our input type to be of type file and we give it a name of image.
Make sure that your development server is running and navigate to post creating form, in my case is http://127.0.0.1:8000/create/post and you should see the following screen:

Now we can be able to choose a file, try to fill the title, content, select an image and hit create post button. You will get the following screen:

You get a success message meaning that our image has been upload successfully. I can confirm this by checking my database:

In my last two posts, we have filled the image field with the name of the image.
How to Display the Stored Image
The next step is to display the image to each post if they have images, let’s edit our post_list.blade.php file and make sure it has the following code:
@extends('layouts.app')

@section('content')
    <div class="container-fluid">
        <div class="row">
            @include('partials.sidenavbar')

            <main role="main" class="col-md-9 ml-sm-auto col-lg-10 px-4">
                <div class="d-flex justify-content-between flex-wrap flex-md-nowrap align-items-center pt-3 pb-2 mb-3 border-bottom">
                    <h1 class="h2">All Posts

                    </h1>
                    <a href="{{ route('create_post') }}" class="btn btn-primary float-right">Add Post</a>
                </div>

                @if (session('status'))
                    <div class="alert alert-success">
                        {{ session('status') }}
                    </div>
                @endif

                <div class="row">
                    @foreach($posts as $post)
                        <div class="col-md-4">
                            <div class="card" style="width: 18rem;">
                                @if($post->image)
                                    <img class="card-img-top" src="{{ asset('images/'.$post->image) }}" alt="Blog Post Image">
                                @endif
                                <div class="card-body">
                                    <h5 class="card-title">{{ $post->title }} by <small><i>{{ $post->writer->name }}</i></small></h5>
                                    <p class="card-text">
                                        {{ $post->body }}
                                    </p>
                                    <a href="#" class="card-link btn btn-primary">Edit</a>
                                    <a href="#" class="card-link btn btn-danger" >delete</a>
                                </div>
                            </div>
                        </div>
                    @endforeach
                </div>


            </main>
        </div>
    </div>
@endsection
Let’s understand the code:
- Line 26 to 28 – we have created an if control statement to check whether a post has an image or not.
- Line 27 – if a post has an image we display the image by using asset method provide by Laravel, we pass the name of the folder where our images are uploaded and then we pass the name of the image from our database.
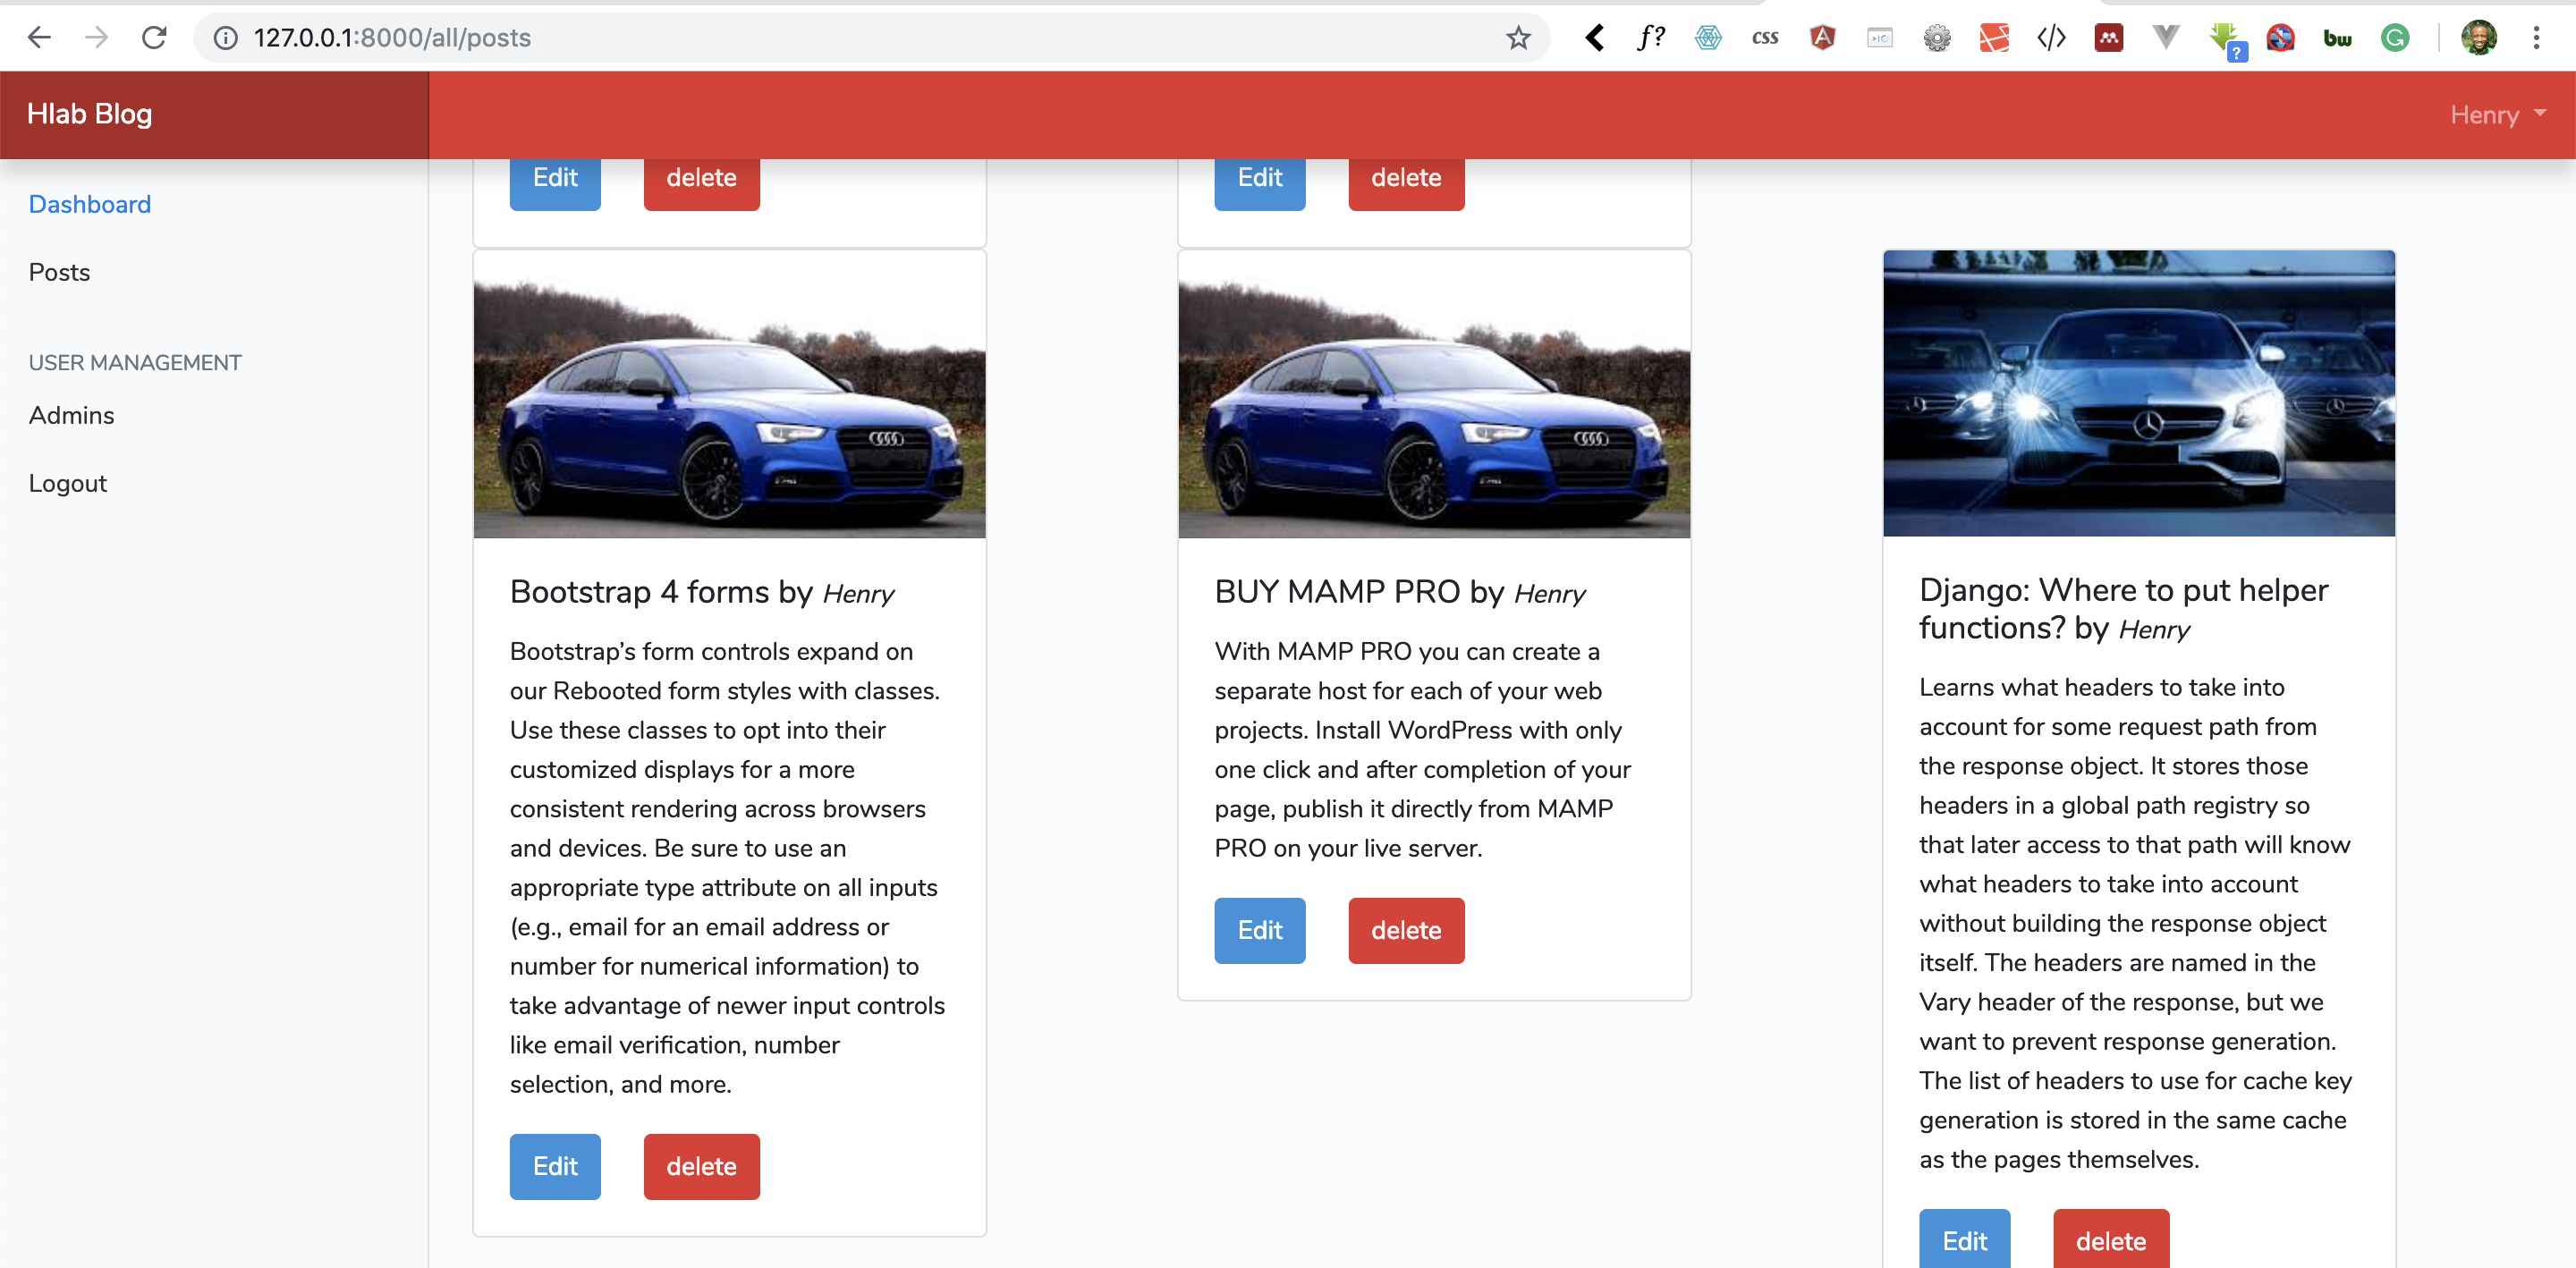
Here is the result of our hard work:

Goal Achieved in this lesson
- Ability to validate image.
- Ability to store image.
- Ability display uploaded image in Laravel
Task
I know you have noticed that we are displaying the whole content of our blog post, try to display the content in summary.
In the next lesson, we will continue building our blog admin portal, step by step together with you and this lesson has given us a great starting point. See you in Lesson VIII
You can grab the code used in this tutorial at blog application in Laravel 5.7


Facebook Comments