Hey and welcome to this Python/Django tutorial series, my name is Henry Mbugua and I will be taking you through the various aspect and new answers of M-Pesa Integration using Django web framework and Python 3.7. In lesson 4, we learned how to prepare our Mpesa model and running migrations, in this lesson we are going to learn how to register our confirmation and validation URLs.
Validation and Confirmation URL’s
The M-Pesa API enables you to register the callback URL’s via which your application will receive payment notifications for the payment to your Paybill or till number. The URLs are used by the C2B payment simulation API for sending transaction details to your application.
There are two URLs required by M-Pesa API, Validation URL and Confirmation URL. Now that we have a quick overview of why we need to register URLs with M-Pesa API. Let’s start developing our URL’s.
In lesson 4, we had created register_urls, validation and confirmation methods. The next step is to open the mpesa_api/urls.py file and make sure it has the following code:
from django.urls import path

from . import views


urlpatterns = [
    path('access/token', views.getAccessToken, name='get_mpesa_access_token'),
    path('online/lipa', views.lipa_na_mpesa_online, name='lipa_na_mpesa'),

    # register, confirmation, validation and callback urls
    path('c2b/register', views.register_urls, name="register_mpesa_validation"),
    path('c2b/confirmation', views.confirmation, name="confirmation"),
    path('c2b/validation', views.validation, name="validation"),
    path('c2b/callback', views.call_back, name="call_back"),

]
Let’s understand the code:
- Line 11 – we have created register URL and we are mapping this URL to register_urls method in mpesa_api/views.py.
- Line 12 – we have created a confirmation URL and we are mapping this URL to confirmation method in mpesa_api/views.py.
- Line 13 – we have created a validation URL and we are mapping this URL to the validation method in mpesa_api/views.py.
- Line 14 – we have created a callback URL and we are mapping this URL to call_back method in mpesa_api/views.py.
With that we all set, in lesson 4, we introduced Ngrok for creating an instant, secure URL to your localhost server through any NAT or firewall.
Running Our Local Development Server Using Ngrok
Running our Django application using Ngrok is super easy, we are assuming that you have already downloaded Ngrok to your machine. On my terminal, I am going to run my Django application using the following command:
python manage.py runserver
Here is the output of my terminal:

From my terminal, I am able to tell that my Django application is running on port 8000. The next step is to run my Ngrok and bind it to port 8000, All I have to do is to locate my Ngrok download and run the following command:
./ngrok http 8000
Here is the output of my terminal:

From my terminal, I am able to locate the secure tunnel which is forwarding to my localhost at port 8000. Our secure URL is the one that has https, in this case, https://91563395.ngrok.io/
Now that we have our secure URL up and running, we need to change some few settings. In our mpesa_api/views.py file make sure it has the following code:
from django.http import HttpResponse, JsonResponse
import requests
from requests.auth import HTTPBasicAuth
import json
from . mpesa_credentials import MpesaAccessToken, LipanaMpesaPpassword
from django.views.decorators.csrf import csrf_exempt
from .models import MpesaPayment


def getAccessToken(request):
    consumer_key = 'cHnkwYIgBbrxlgBoneczmIJFXVm0oHky'
    consumer_secret = '2nHEyWSD4VjpNh2g'
    api_URL = 'https://sandbox.safaricom.co.ke/oauth/v1/generate?grant_type=client_credentials'

    r = requests.get(api_URL, auth=HTTPBasicAuth(consumer_key, consumer_secret))
    mpesa_access_token = json.loads(r.text)
    validated_mpesa_access_token = mpesa_access_token['access_token']

    return HttpResponse(validated_mpesa_access_token)


def lipa_na_mpesa_online(request):
    access_token = MpesaAccessToken.validated_mpesa_access_token
    api_url = "https://sandbox.safaricom.co.ke/mpesa/stkpush/v1/processrequest"
    headers = {"Authorization": "Bearer %s" % access_token}
    request = {
        "BusinessShortCode": LipanaMpesaPpassword.Business_short_code,
        "Password": LipanaMpesaPpassword.decode_password,
        "Timestamp": LipanaMpesaPpassword.lipa_time,
        "TransactionType": "CustomerPayBillOnline",
        "Amount": 1,
        "PartyA": 254728851119,  # replace with your phone number to get stk push
        "PartyB": LipanaMpesaPpassword.Business_short_code,
        "PhoneNumber": 254728851119,  # replace with your phone number to get stk push
        "CallBackURL": "https://sandbox.safaricom.co.ke/mpesa/",
        "AccountReference": "Henry",
        "TransactionDesc": "Testing stk push"
    }

    response = requests.post(api_url, json=request, headers=headers)
    return HttpResponse('success')


@csrf_exempt
def register_urls(request):
    access_token = MpesaAccessToken.validated_mpesa_access_token
    api_url = "https://sandbox.safaricom.co.ke/mpesa/c2b/v1/registerurl"
    headers = {"Authorization": "Bearer %s" % access_token}
    options = {"ShortCode": LipanaMpesaPpassword.Business_short_code,
               "ResponseType": "Completed",
               "ConfirmationURL": "https://91563395.ngrok.io/api/v1/c2b/confirmation",
               "ValidationURL": "https://91563395.ngrok.io/api/v1/c2b/validation"}
    response = requests.post(api_url, json=options, headers=headers)

    return HttpResponse(response.text)


@csrf_exempt
def call_back(request):
    pass


@csrf_exempt
def validation(request):

    context = {
        "ResultCode": 0,
        "ResultDesc": "Accepted"
    }
    return JsonResponse(dict(context))


@csrf_exempt
def confirmation(request):
    mpesa_body =request.body.decode('utf-8')
    mpesa_payment = json.loads(mpesa_body)

    payment = MpesaPayment(
        first_name=mpesa_payment['FirstName'],
        last_name=mpesa_payment['LastName'],
        middle_name=mpesa_payment['MiddleName'],
        description=mpesa_payment['TransID'],
        phone_number=mpesa_payment['MSISDN'],
        amount=mpesa_payment['TransAmount'],
        reference=mpesa_payment['BillRefNumber'],
        organization_balance=mpesa_payment['OrgAccountBalance'],
        type=mpesa_payment['TransactionType'],

    )
    payment.save()

    context = {
        "ResultCode": 0,
        "ResultDesc": "Accepted"
    }

    return JsonResponse(dict(context))
On lines 51 and 52 we have changed our ConfirmationUrl and ValidationUrl to use our secure URL we get from Ngrok. The next step is to tell Django to allow Ngrok in the allowed host’s otherwise you will get the following error.
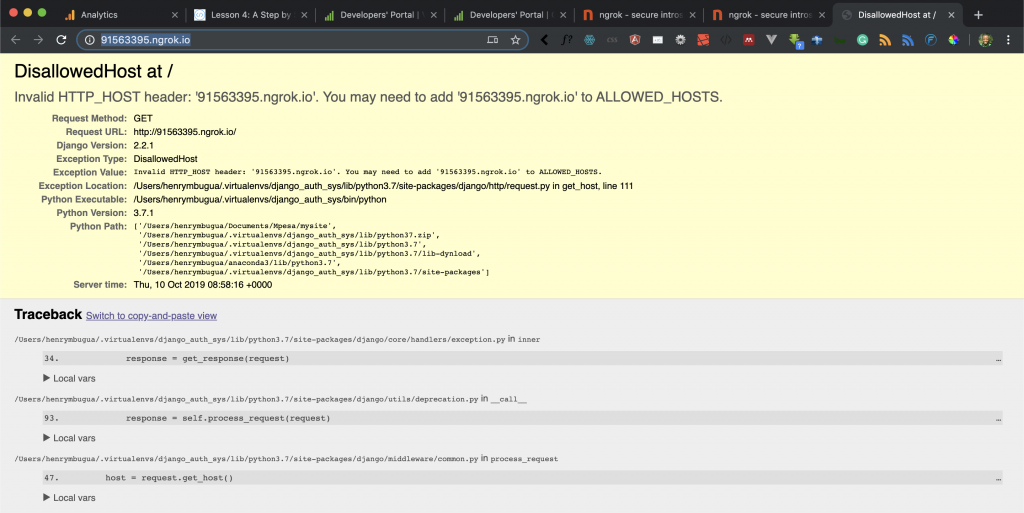
Open mysite/settings.py file and make sure it has the following code:
"""
Django settings for mysite project.
Generated by 'django-admin startproject' using Django 2.2.4.
For more information on this file, see
https://docs.djangoproject.com/en/2.2/topics/settings/
For the full list of settings and their values, see
https://docs.djangoproject.com/en/2.2/ref/settings/
"""
import os
# Build paths inside the project like this: os.path.join(BASE_DIR, ...)
BASE_DIR = os.path.dirname(os.path.dirname(os.path.abspath(__file__)))
# Quick-start development settings - unsuitable for production
# See https://docs.djangoproject.com/en/2.2/howto/deployment/checklist/
# SECURITY WARNING: keep the secret key used in production secret!
SECRET_KEY = 'nl9&eqhh!092-vf*5#vrp8p8n=5^35=$0+8b&wh-sh&lino'
# SECURITY WARNING: don't run with debug turned on in production!
DEBUG = True
ALLOWED_HOSTS = ['91563395.ngrok.io', '127.0.0.1', 'localhost']
# Application definition
INSTALLED_APPS = [
'mpesa_api.apps.MpesaApiConfig',
'django.contrib.admin',
'django.contrib.auth',
'django.contrib.contenttypes',
'django.contrib.sessions',
'django.contrib.messages',
'django.contrib.staticfiles',
]
MIDDLEWARE = [
'django.middleware.security.SecurityMiddleware',
'django.contrib.sessions.middleware.SessionMiddleware',
'django.middleware.common.CommonMiddleware',
'django.middleware.csrf.CsrfViewMiddleware',
'django.contrib.auth.middleware.AuthenticationMiddleware',
'django.contrib.messages.middleware.MessageMiddleware',
'django.middleware.clickjacking.XFrameOptionsMiddleware',
]
ROOT_URLCONF = 'mysite.urls'
TEMPLATES = [
{
'BACKEND': 'django.template.backends.django.DjangoTemplates',
'DIRS': [],
'APP_DIRS': True,
'OPTIONS': {
'context_processors': [
'django.template.context_processors.debug',
'django.template.context_processors.request',
'django.contrib.auth.context_processors.auth',
'django.contrib.messages.context_processors.messages',
],
},
},
]
WSGI_APPLICATION = 'mysite.wsgi.application'
# Database
# https://docs.djangoproject.com/en/2.2/ref/settings/#databases
DATABASES = {
'default': {
'ENGINE': 'django.db.backends.sqlite3',
'NAME': os.path.join(BASE_DIR, 'db.sqlite3'),
}
}
# Password validation
# https://docs.djangoproject.com/en/2.2/ref/settings/#auth-password-validators
AUTH_PASSWORD_VALIDATORS = [
{
'NAME': 'django.contrib.auth.password_validation.UserAttributeSimilarityValidator',
},
{
'NAME': 'django.contrib.auth.password_validation.MinimumLengthValidator',
},
{
'NAME': 'django.contrib.auth.password_validation.CommonPasswordValidator',
},
{
'NAME': 'django.contrib.auth.password_validation.NumericPasswordValidator',
},
]
# Internationalization
# https://docs.djangoproject.com/en/2.2/topics/i18n/
LANGUAGE_CODE = 'en-us'
TIME_ZONE = 'UTC'
USE_I18N = True
USE_L10N = True
USE_TZ = True
# Static files (CSS, JavaScript, Images)
# https://docs.djangoproject.com/en/2.2/howto/static-files/
STATIC_URL = '/static/'
On line 28, we have added Ngrok URL and localhost to allowed host and we are ready to test our Application.
How to Register Confirmation and Validation URL
To register the confirmation and validation URL, we are going to use postman. Open postman and in the URL use https://91563395.ngrok.io/api/c2b/register
And hit send.
NB: Ngrok will give a different URL every time you run it. Remember to update the urls in your respective urls.
Here is a screenshot of my postman:
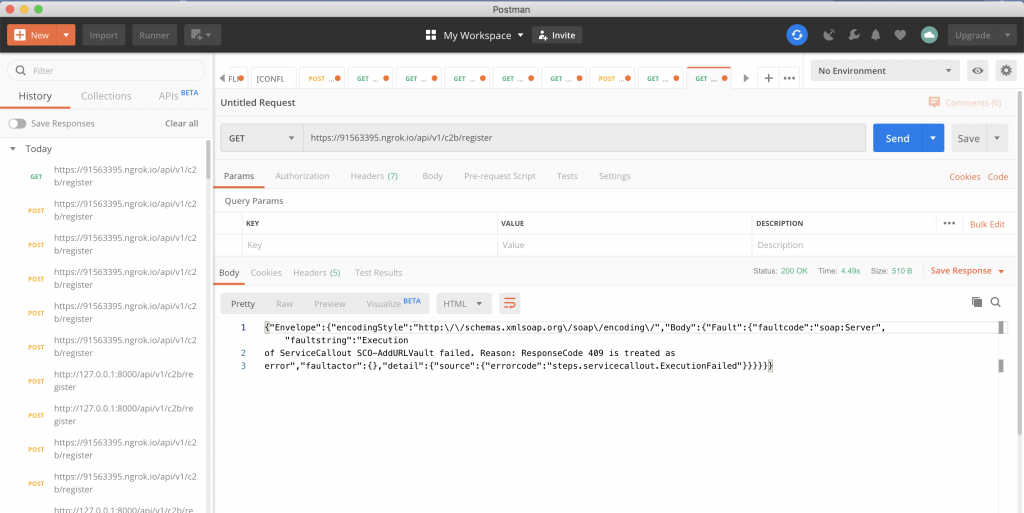
On this occasion, we are successfully calling Safaricom Mpesa Register URL API but there seems to be an error on Safaricom side with their soap conversion since we are expecting a rest response. This can be further confirmed when trying to register urls in the Daraja portal.
Here is a screenshot from Daraja portal:
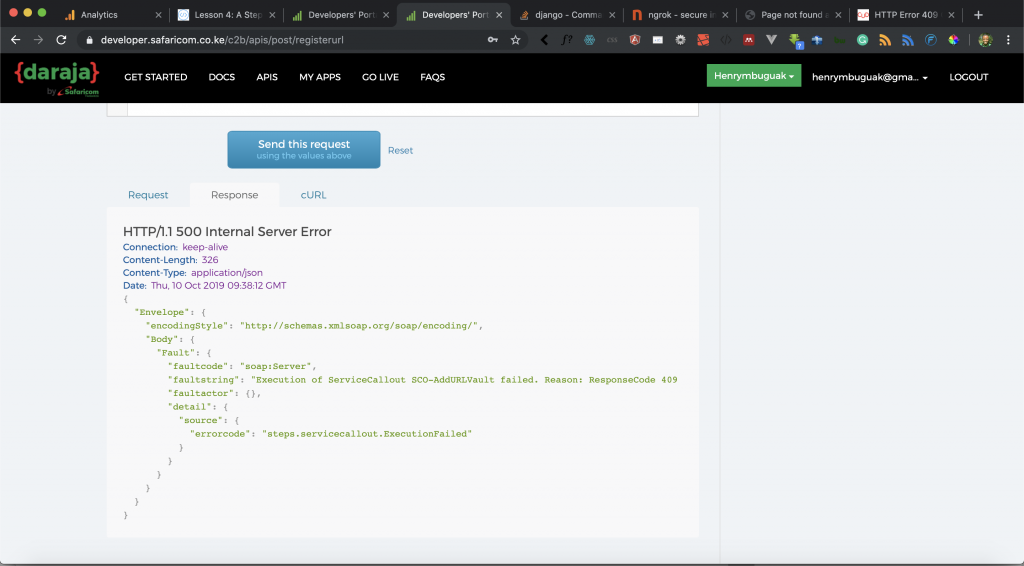
When you get the above error, don’t panic. It’s a normal system error and Safaricom offers various ways to contact them regarding the M-pesa API. I prefer writing an Email to apisupport@safaricom.co.ke and cc m-pesabusiness@safaricom.co.ke
With that we conclude this lesson, you can learn more about M-pesa API.
Note:
Once the error has been resolved on the Safaricom side I will update this tutorial with the correct response we should get from the Safaricom side.
Goal Achieved in This Lesson
In this lesson, we have achieved the following:
- We have learned to map confirmation and validation URL to our views.
- We have learned how to use Ngrok to create a secure URL to the localhost.
- We have learned how to use postman to register urls to Mpesa API.
To get the code associated with this lesson visit Python/Django Mpesa Integration. See you in lesson 6.


Facebook Comments