Hello and welcome to this Vue js tutorial series, my name is Henry Mbugua, I will be taking you through the various aspects, and new answers of how to consuming Nasa Open APIs using Vue.js and Axios.js which is a promise-based HTTP client for browsers and node.js, Vue.js is a progressive JavaScript Framework for building reactive user interfaces. In Lesson 2, we learned how to refactor our code and essentials tool called vue devtools Chrome browser extension:
Asteroids: Near-Earth Object Web Services (Neows)
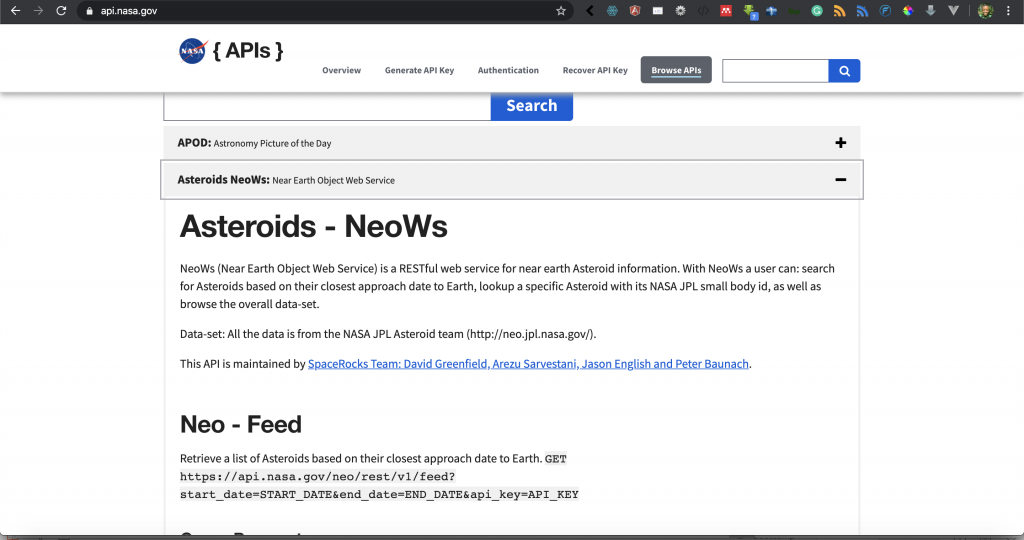
In this lesson, we are going to learn loop through an array and render the data in a page. Nasa has an API called Near-Earth Object Web Services, here is a screenshot:

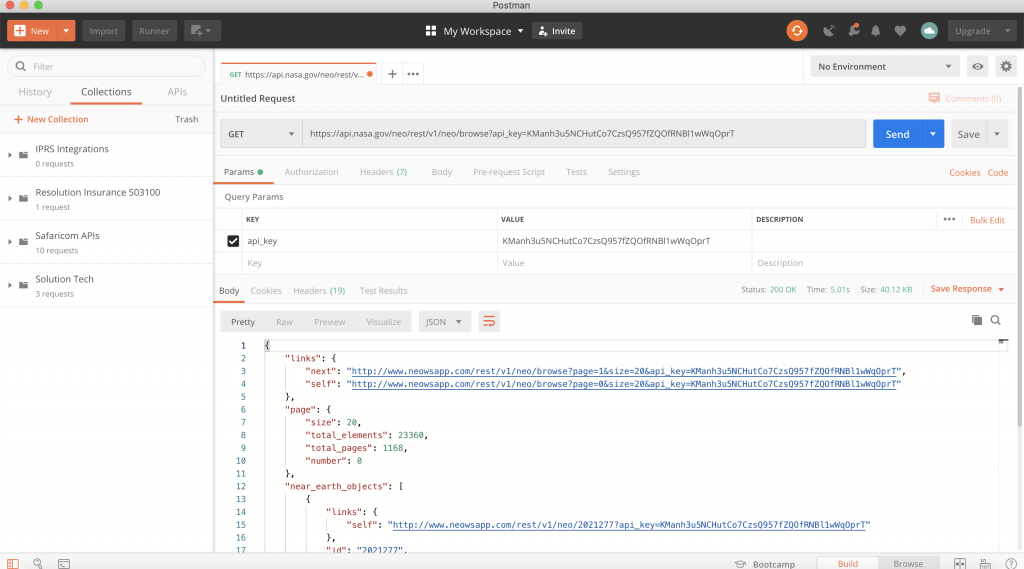
With Neows, a user can search for Asteroids based on their closest approach date to earth. In order to view the kind of data we are going to deal with, open postman and use the following URL and hit send:
NB: Remember to pass Demo key provided by Nasa API
Neows data-set URL:
https://api.nasa.gov/neo/rest/v1/neo/browse?api_key=DEMO_KEY

We have just taken a quick look at the data we get from Neows endpoint, in the above data response we are interested in the near_earth_objects array. We are going to do now is to create a new Html file called neows.html and make sure it has the following code:
<!DOCTYPE html>
<html lang="en">
<head>
    <meta charset="UTF-8">
    <title>Title</title>
    <!-- Bootstrap CSS -->
    <link rel="stylesheet" href="https://stackpath.bootstrapcdn.com/bootstrap/4.4.1/css/bootstrap.min.css" integrity="sha384-Vkoo8x4CGsO3+Hhxv8T/Q5PaXtkKtu6ug5TOeNV6gBiFeWPGFN9MuhOf23Q9Ifjh" crossorigin="anonymous">

    <title>HLAB - Learning Vue.js</title>

</head>
<body>

<div id="app">
    <div class="container">
        <div class="row">
            <div class="col-md-12 mt-5">
                <div class="card">
                    <div class="card-header">Asteroids - Near Earth Object Web Services</div>
                    <div class="card-body">
                        <table class="table table-hover">
                            <thead>
                            <tr>
                                <th>Reference ID</th>
                                <th>Asteroid Name</th>
                                <th>Nasa Asteroid URL</th>
                                <th>Date Close to Earth</th>
                            </tr>
                            </thead>
                            <tbody v-cloak>
                            <tr v-for="item in asteroids">
                                <td>{{ item.neo_reference_id }}</td>
                                <td>{{ item.name}}</td>
                                <td><a href="{{ item.nasa_jpl_url }}">{{ item.nasa_jpl_url }}</a></td>
                                <td>{{ retrieveAsteroidCloseApproachDate(item) }}</td>
                            </tr>
                            </tbody>
                        </table>

                    </div>
                    <div class="card-footer">Neo - Browse</div>
                </div>
            </div>
        </div>
    </div>
</div>


<!-- Vue js JavaScript -->
<script src="https://cdn.jsdelivr.net/npm/vue/dist/vue.js"></script>

<!-- Axios js JavaScript -->
<script src="https://cdn.jsdelivr.net/npm/axios/dist/axios.min.js"></script>

<script>
    var vm = new Vue({
        el: "#app",
        data: {
            asteroids: []
        },

        created: function () {
            this.retrieveAsteroids();
        },

        methods: {
            retrieveAsteroids: function () {
                var nasaApiKey = 'KManh3u5NCHutCo7CzsQ957fZQOfRNBl1wWqOprT';
                var url = 'https://api.nasa.gov/neo/rest/v1/neo/browse?api_key=' + nasaApiKey;
                axios.get(url).then(function (response) {
                    vm.asteroids = response.data.near_earth_objects.slice(0, 20);
                });
            },
            retrieveAsteroidCloseApproachDate: function (item) {
                if (item.close_approach_data.length > 0) {
                    return item.close_approach_data[0].close_approach_date;
                }
                return "Date Not Available";

            }
        }
    })
</script>

</body>
</html>
Now let us understand the code we have just written. We are going to start with the following code:
<!-- Vue js JavaScript -->
<script src="https://cdn.jsdelivr.net/npm/vue/dist/vue.js"></script>

<!-- Axios js JavaScript -->
<script src="https://cdn.jsdelivr.net/npm/axios/dist/axios.min.js"></script>

<script>
    var vm = new Vue({
        el: "#app",
        data: {
            asteroids: []
        },

        created: function () {
            this.retrieveAsteroids();
        },

        methods: {
            retrieveAsteroids: function () {
                var nasaApiKey = 'KManh3u5NCHutCo7CzsQ957fZQOfRNBl1wWqOprT';
                var url = 'https://api.nasa.gov/neo/rest/v1/neo/browse?api_key=' + nasaApiKey;
                axios.get(url).then(function (response) {
                    vm.asteroids = response.data.near_earth_objects.slice(0, 20);
                });
            },
            retrieveAsteroidCloseApproachDate: function (item) {
                if (item.close_approach_data.length > 0) {
                    return item.close_approach_data[0].close_approach_date;
                }
                return "Date Not Available";

            }
        }
    })
</script>
- Line 51 – we pull Vue.js from a content delivery network.
- Line 54 – we pull in Axios.js from the content delivery network.
- Line 56 to 84 – we create our Vue logic.
- Line 57 – we create our Vue instance.
- Line 58 – we create an el with the id of the app. This where we will attach our Vue instance in the DOM.
- Line 59 to line 61 – we define our data object.
- Line 60 – we define our data attribute by the name of asteroids which is of type array.
- Line 63 to 65 – we use a hook called created which is provided by the Vue Instance lifecycle.
- Line 64 – we call a function called retrieveAsteroids.
- Line 67 to line 82 – we define our vue method.
- Line 68 to line 74 – we define a function called retrieveAsteroids.
- Line 69 – we define a variable called nasaApiKey which we pass our Nasa API key.
- Line 70 – we define our url variable which we pass Neows endpoint and also concatenate with our api key.
- Line 71 to line 73 – we initiate a get request to Neows endpoint.
- Line 72 – we bind our data to attribute asteroids with the response we get from our get response. In this case, we access near-earth objects, we use a slice method to define that we just need 20 entries.
- Line 75 to line 81 – we define another function called retrieveAsteriodsCloseApprochDate which we are going to use to check whether a close approach date exists or not.
- Line 76 to line 78 – we are using a control statement to check if the item passed to this function has data or not using length to be greater than zero. If there is data, on line 77 we return the close approach date of the item.
- Line 79 – if there is no close approach date we return a string that says date not available.
The next question would be, how do we render this data in our Html code. Let us understand the following code:
<div id="app">
    <div class="container">
        <div class="row">
            <div class="col-md-12 mt-5">
                <div class="card">
                    <div class="card-header">Asteroids - Near Earth Object Web Services</div>
                    <div class="card-body">
                        <table class="table table-hover">
                            <thead>
                            <tr>
                                <th>Reference ID</th>
                                <th>Asteroid Name</th>
                                <th>Nasa Asteroid URL</th>
                                <th>Date Close to Earth</th>
                            </tr>
                            </thead>
                            <tbody v-cloak>
                            <tr v-for="item in asteroids">
                                <td>{{ item.neo_reference_id }}</td>
                                <td>{{ item.name}}</td>
                                <td><a href="{{ item.nasa_jpl_url }}">{{ item.nasa_jpl_url }}</a></td>
                                <td>{{ retrieveAsteroidCloseApproachDate(item) }}</td>
                            </tr>
                            </tbody>
                        </table>

                    </div>
                    <div class="card-footer">Neo - Browse</div>
                </div>
            </div>
        </div>
    </div>
</div>
- Line 14 to 46 – we define our div with an id app, where our Vue instance will attach itself in this context.
- Line 15 to line 45 we are just using Bootstrap 4 classes to define our user interface which consists of bootstrap card and table.
- Line 21 to line 38 – we define a bootstrap table that will hold our data.
- Line 22 to line 29 – we define table headers. Line 24 we have Reference Id, line 25 we have Asteroid name, line 26 we have Nasa asteroid URL and line 27 we have date close to the earth.
- Line 30 – we have passed a vue.js directive called v-cloak which ensures that our Vue instance has completed compiling to prevents flicker when we load our page.
- Line 31 – In order for us to loop through our array of asteroid we use a directive called v-for which gives us the ability to loop through an array. In our v-for loop, we define a name called item in asteroids. The item will help us access a single asteroid data.
- Line 32 – we use curly braces to display asteroid reference id.
- Line 33 – we use curly braces to display asteroid name.
- Line 34 – we use curly braces to display asteroid Nasa URL.
- Line 35 – we use curly braces and the method we defined earlier to display the close approach date of the asteroids.
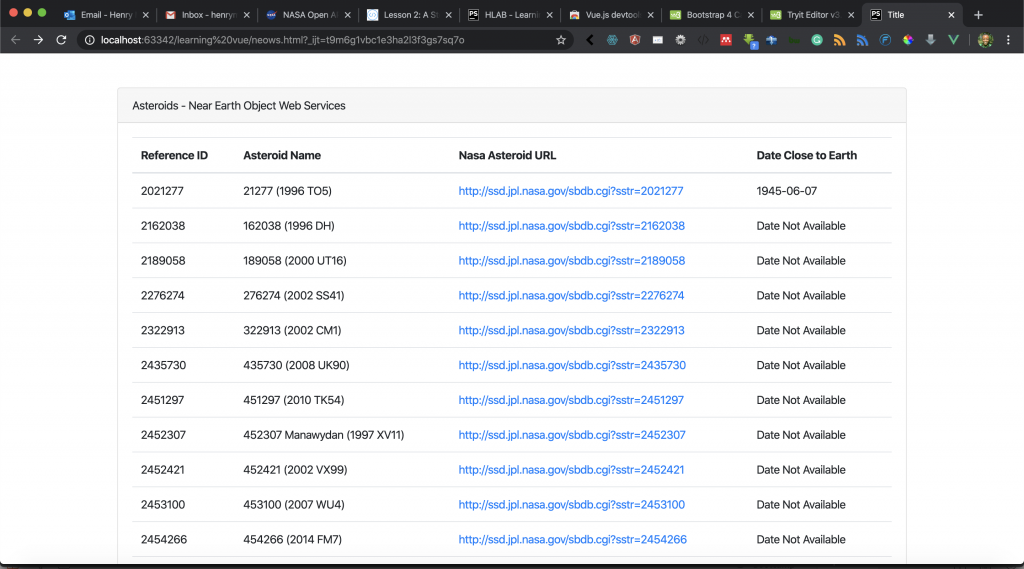
With that, we are now ready to test the code, open neows.html in your browser and you should see the following:

And that’s how we can loop through an array of data in Vue.js
Goal Achieved in This Lesson
In this lesson, we have achieved the following:
- We have learned how we can consume Neows endpoint from Nasa.
- We have learned how to define array data type in Vue.js instance.
- We have learned how to create another method in Vue.js which uses if control statement.
- We have learned how to render data in the array using v-for directive.
In our next tutorial, we are going to learn more about the v-for directive and in the meantime, you can learn more on Vue.js documentation.


Facebook Comments