Hey and welcome to this Python/Django tutorial series, my name is Henry Mbugua and I will be taking you through the various aspect and new answer of M-pesa Integration using Django web framework and Python 3.7. In lesson two we learned how to generate mpesa token, in this lesson we are going to learn how to create an STK push integration to M-pesa on Daraja.
STK Push Integration to M-Pesa on Daraja
A good use case of what STK push can do is buying a product/services online. Let’s assume you are doing shopping on Jumia website. You add a product to the cart, once you are done. You decide to pay via M-pesa, you are taken directly to the Mpesa menu asking you to confirm the payment by putting the pin. You do not have to add paybill etc., that is what STK can do.
Lipa na M-pesa online payment API is used to initiate an M-pesa transaction on behalf of the customer using STK push. On this tutorial, we are going to learn how to do an STK push.
M-pesa STK Push Parameters
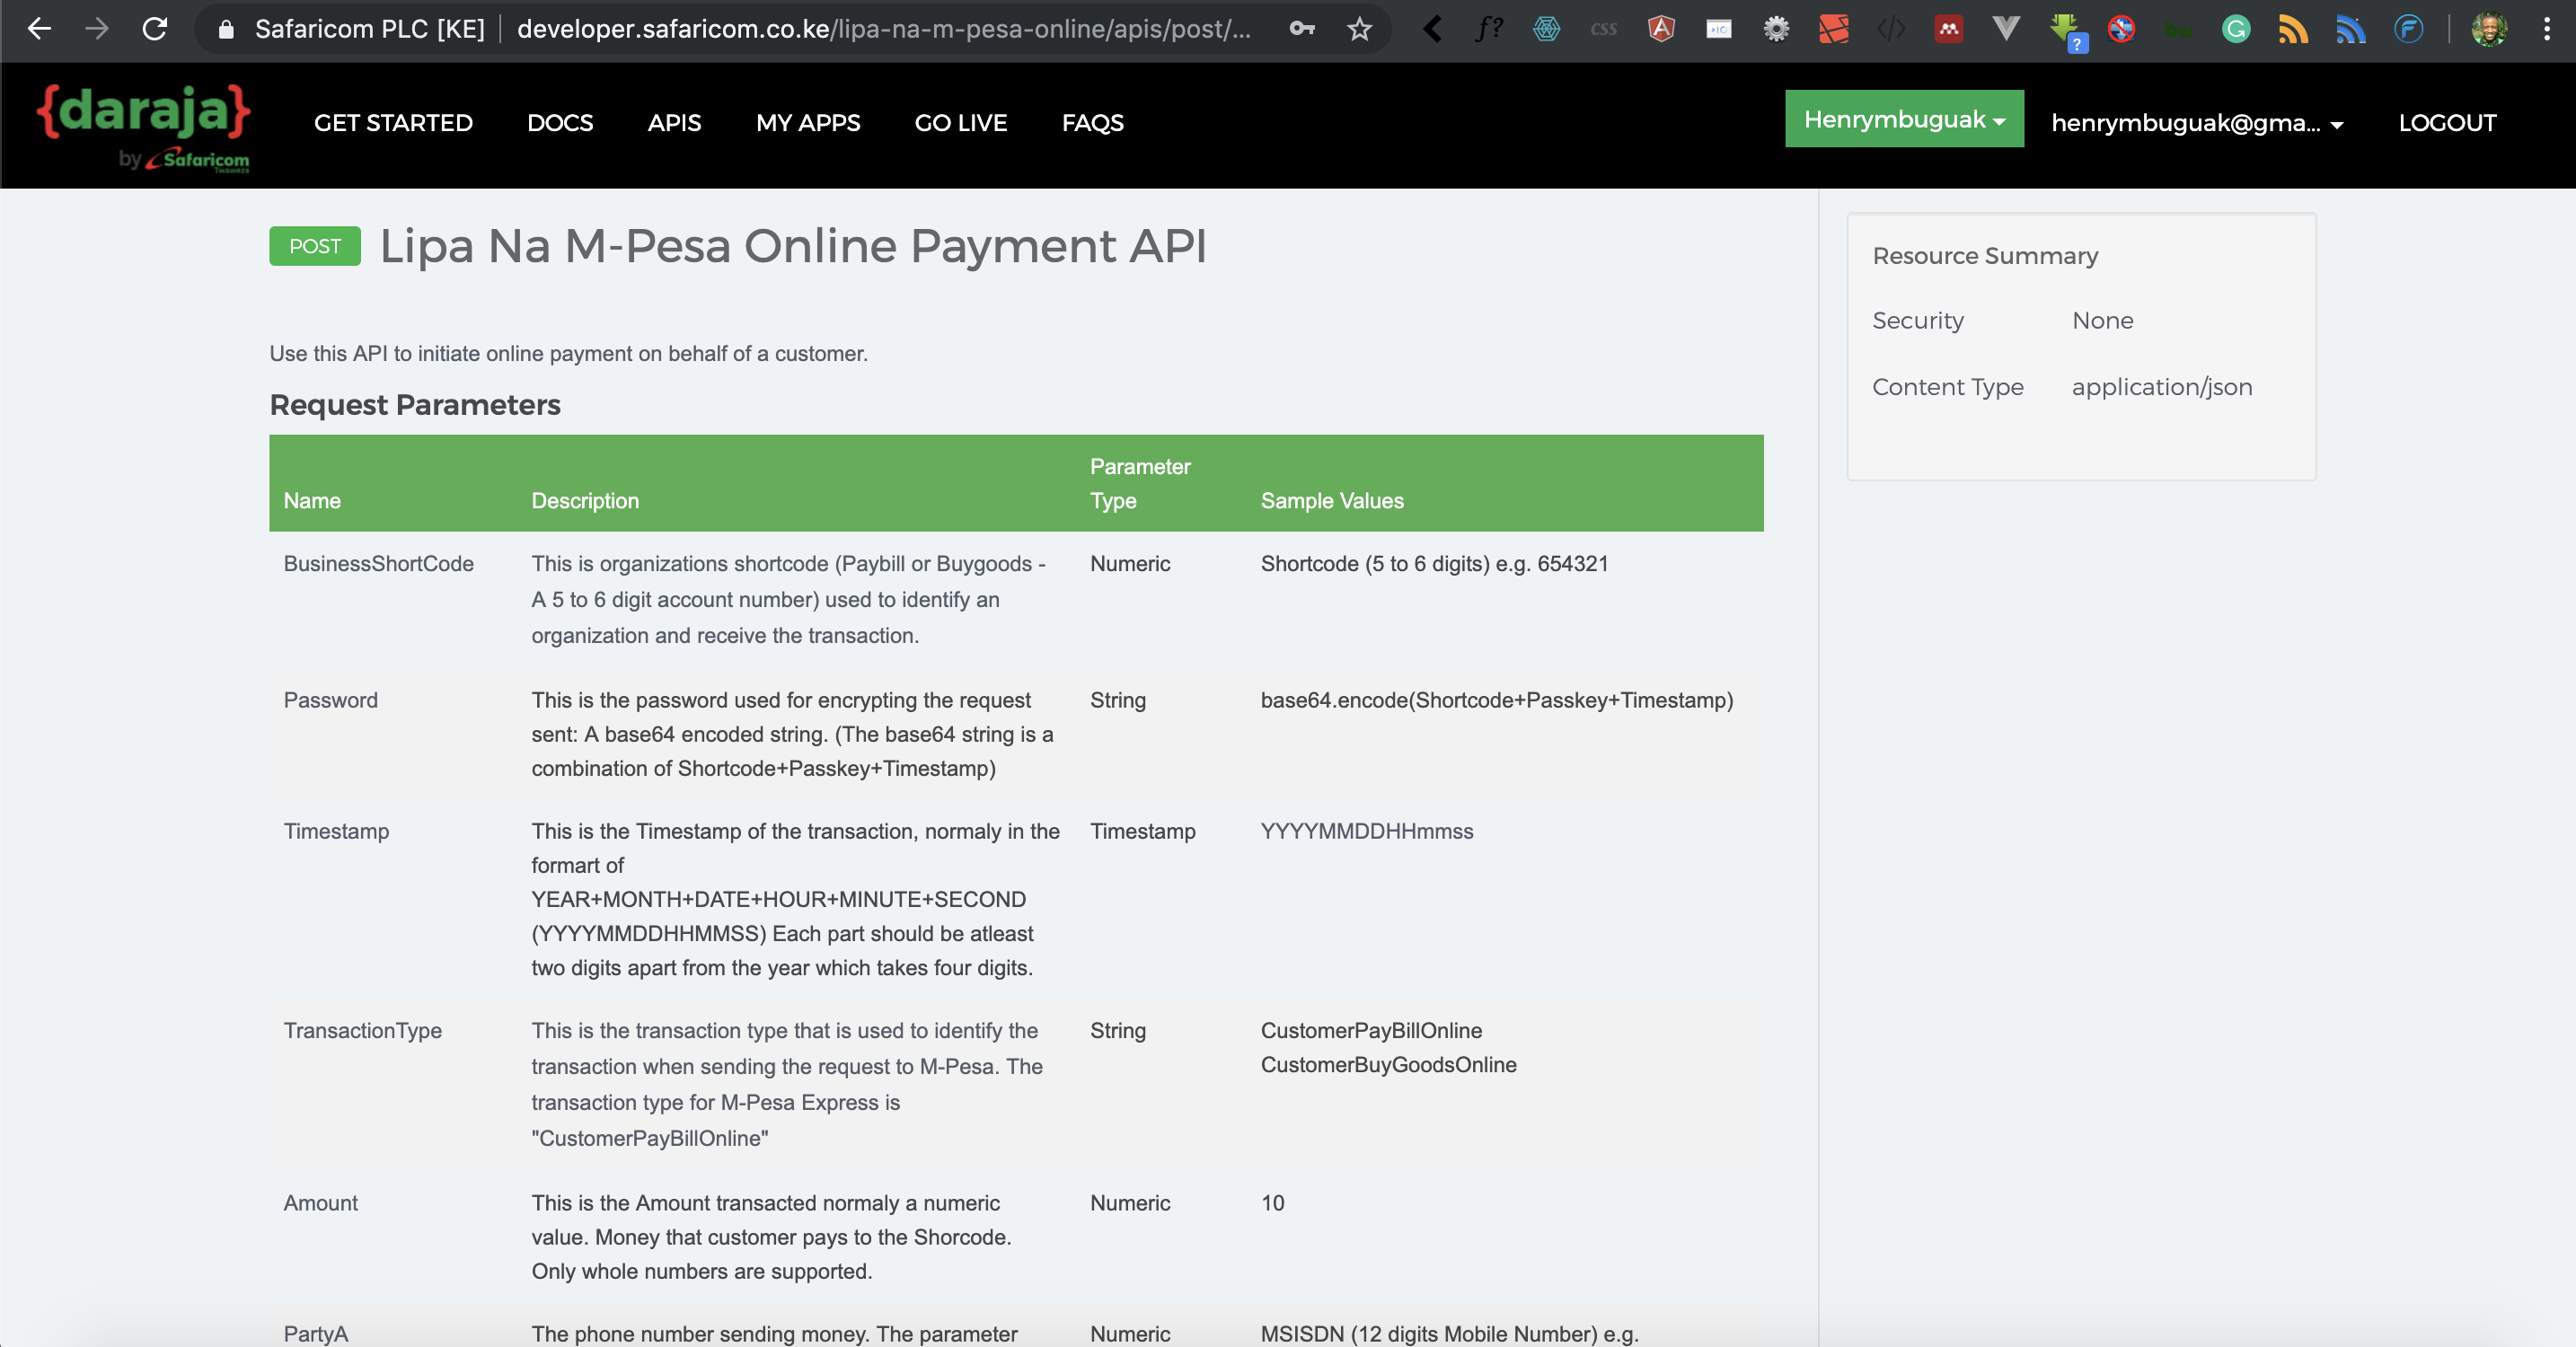
To initiate an STK push, you will need to understand the parameters required by Lipa na M-pesa online payment API. Here is a screenshot of the required parameter:

Learn more about the parameter required to initiate STK push.
Now that you have read about the parameters required to initiate STK push, let’s code. Inside our mpesa_api directory create a file called mpesa_credentials.py. Your folder structure should look like this:

Now make sure that mpesa_credentials.py file has the following code:
import requests
import json
from requests.auth import HTTPBasicAuth
from datetime import datetime
import base64


class MpesaC2bCredential:
    consumer_key = 'cHnkwYIgBbrxlgBoneczmIJFXVm0oHky'
    consumer_secret = '2nHEyWSD4VjpNh2g'
    api_URL = 'https://sandbox.safaricom.co.ke/oauth/v1/generate?grant_type=client_credentials'


class MpesaAccessToken:
    r = requests.get(MpesaC2bCredential.api_URL,
                     auth=HTTPBasicAuth(MpesaC2bCredential.consumer_key, MpesaC2bCredential.consumer_secret))
    mpesa_access_token = json.loads(r.text)
    validated_mpesa_access_token = mpesa_access_token['access_token']


class LipanaMpesaPpassword:
    lipa_time = datetime.now().strftime('%Y%m%d%H%M%S')
    Business_short_code = "174379"
    passkey = 'bfb279f9aa9bdbcf158e97dd71a467cd2e0c893059b10f78e6b72ada1ed2c919'

    data_to_encode = Business_short_code + passkey + lipa_time

    online_password = base64.b64encode(data_to_encode.encode())
    decode_password = online_password.decode('utf-8')
Let’s understand the code in mpesa_credentials.py file:
- Line 1 to 5 – we import the classes we need to use in this file.
- Line 8 – we create a class called MpesaC2BCredential.
- Line 9 – we create our consumer_key variable
- Line 10 – we create our consumer_secret variable
- Line 11 – we create a URL variable for generating the mpesa token.
- Line 14 to 18 – we create a class called MpesaAccessToken. This is the class we are going to use to make a call to mpesa.
- Line 21 to 29 – we create a class called LipanaMpesaPassword. From Mpesa Daraja documentation, Safaricom explains how the password should be generated.
- Line 22 – we define the format of our transaction timestamp where we start with the year, month, date, hour, minute and second.
- Line 23 – we define our business Shortcode (Paybill no). In this case, we are using test credentials provided by Safaricom Daraja sandbox.
- Line 24 – we define our passkey, this is also given in Mpesa sandbox test credentials.
- Line 26 – we define our password used to encrypt the request we send mpesa API STK push URL. The password is a base64 string which is a combination of Shortcode+Passkey+Timestamp.
- Line 28 – we encode our password to base64 string.
- Line 29 – we decode our password to UTF-8
The next step is to update our mpesa_api/views.py file with the following code:
from django.http import HttpResponse
import requests
from requests.auth import HTTPBasicAuth
import json
from . mpesa_credentials import MpesaAccessToken, LipanaMpesaPpassword


def getAccessToken(request):
    consumer_key = 'cHnkwYIgBbrxlgBoneczmIJFXVm0oHky'
    consumer_secret = '2nHEyWSD4VjpNh2g'
    api_URL = 'https://sandbox.safaricom.co.ke/oauth/v1/generate?grant_type=client_credentials'

    r = requests.get(api_URL, auth=HTTPBasicAuth(consumer_key, consumer_secret))
    mpesa_access_token = json.loads(r.text)
    validated_mpesa_access_token = mpesa_access_token['access_token']

    return HttpResponse(validated_mpesa_access_token)


def lipa_na_mpesa_online(request):
    access_token = MpesaAccessToken.validated_mpesa_access_token
    api_url = "https://sandbox.safaricom.co.ke/mpesa/stkpush/v1/processrequest"
    headers = {"Authorization": "Bearer %s" % access_token}
    request = {
        "BusinessShortCode": LipanaMpesaPpassword.Business_short_code,
        "Password": LipanaMpesaPpassword.decode_password,
        "Timestamp": LipanaMpesaPpassword.lipa_time,
        "TransactionType": "CustomerPayBillOnline",
        "Amount": 1,
        "PartyA": 254728851119,  # replace with your phone number to get stk push
        "PartyB": LipanaMpesaPpassword.Business_short_code,
        "PhoneNumber": 254728851119,  # replace with your phone number to get stk push
        "CallBackURL": "https://sandbox.safaricom.co.ke/mpesa/",
        "AccountReference": "Henry",
        "TransactionDesc": "Testing stk push"
    }

    response = requests.post(api_url, json=request, headers=headers)
    return HttpResponse('success')
Let’s understand the code we have added in this file:
- Line 5 – we import our MpesaAccessToken and LipanaMpesaPpassword classes from mpesa_credentials.py file.
- Line 20 to 39 – we define our STK push method called lipa_na_mpesa_online.
- Line 21 – we get our mpesa access token.
- Line 22 – we define our STK push URL provided by Safaricom.
- Line 23 – we define our headers where we pass our access token.
- Line 24 to 36 – we define our STK push parameters.
- Line 25 – we pass our mpesa Shortcode.
- Line 26 – we pass our mpesa password.
- Line 27 – we define the transaction timestamp.
- Line 28 – we define the transaction type. Since it’s STK push we use CustomerPayBillOnline
- Line 29 – we define the amount, in this case, one shilling.
- Line 30 – we define the phone number sending the money.
- Line 31 – we define the organization shortcode receiving the funds.
- Line 32 – we define the mobile number to receive STK pin prompt.
- Line 33 – we define a valid URL which will receive notification from Mpesa-api. Note this should be your confirmation URL.
- Line 34 – we define an identifier of the transaction.
- Line 35 – we define the description of what the transaction is all about.
- Line 38 – we get the response from Safaricom mpesa api.
- Line 39 – we define a response, of course, you can choose to redirect the user to a different page. In my case, I respond with HTTP response success.
The next is to define URL for our STK push. Open mpesa_api/urls.py file and make sure it has the following code:
from django.urls import path

from . import views


urlpatterns = [
    path('access/token', views.getAccessToken, name='get_mpesa_access_token'),
    path('online/lipa', views.lipa_na_mpesa_online, name='lipa_na_mpesa'),
]
On line 8, we define our URL that is mapped to our lipa_na_mpesa_online method. That’s it, let’s test our code. Make sure your development server is running by using the following command:
python manage.py runserver
Now that your development server is running, open postman application that we learned in Lesson 2. Here is a screenshot of my postman results:

In the URL sections, I use http://127.0.0.1:8000/api/v1/online/lipa to trigger the Mpesa STK push. I get a success response meaning there is no error in our code. Awesome, since the STK push was successfully initiated, on my phone I receive the STK push. Here is the screenshot:

That is how we initiate an STK push in the Django web framework and Python.
Goal Achieved in This Lesson
In this lesson, we have achieved the following:
- We learned how to generate mpesa transaction timestamp
- We have learned how to generate Lipa na mpesa password
- We have learned how to successfully initiate STK push.
To get the code associated with this lesson visit Python/Django Mpesa Integration. See you in lesson 4.


Facebook Comments