Hello and welcome to part III of this tutorial series, my name is Henry Mbugua and am really excited to continue building our blog application using Laravel 5.7. In part II of this tutorial series, we managed to register a user and logged in our default admin dashboard
The next step in this tutorial is to customize our admin dashboard using bootstrap 4 frontend framework, Laravel 5.7 uses Bootstrap 4 by default so we do not need to install any bootstrap file or jQuery. I am going to open my project on my editor(Phpstorm), in order for us to change the look and feel of the dashboard, we need to locate the view that is loaded at this point.

How to locate the admin dashboard view
The best way for us to locate the view that is loaded is to be smart, Laravel has so many folders and sometimes it can be scary but locating the view is pretty easy. From our browser, we have this URL: http://127.0.0.1:8000/home meaning that in the web.php file there is route define as /home here is a folder structure to locate the web.php file.

Once you locate the web.php file, open and you will see the following code in that file:
<?php

/*
|--------------------------------------------------------------------------
| Web Routes
|--------------------------------------------------------------------------
|
| Here is where you can register web routes for your application. These
| routes are loaded by the RouteServiceProvider within a group which
| contains the "web" middleware group. Now create something great!
|
*/

Route::get('/', function () {
    return view('welcome');
});

Auth::routes();

Route::get('/home', 'HomeController@index')->name('home');
Online 20, we see that there’s a route define called /home and it goes to a controller called HomeController at a method called index, hence that’s why we have HomeController@index. Now let’s open the HomeController located at app/Http/Controllers here is a folder structure for guidance.

Now open HomeController and you will see the following code:
<?php

namespace App\Http\Controllers;

use Illuminate\Http\Request;

class HomeController extends Controller
{
    /**
     * Create a new controller instance.
     *
     * @return void
     */
    public function __construct()
    {
        $this->middleware('auth');
    }

    /**
     * Show the application dashboard.
     *
     * @return \Illuminate\Contracts\Support\Renderable
     */
    public function index()
    {
        return view('home');
    }
}
From line 24 to 27 you will see a method called index. Online 26, you see the following code:
return view(‘home’);
To locate this view, go to resources/views/home.blade.php here is a folder structure of locating this view.

Now that we know how to locate views in Laravel let’s change the appearance of our admin dashboard.
Changing Our Admin Dashboard Look and Feel
Open home.blade.php file and make sure it has the following code:
@extends('layouts.app')

@section('content')
    <div class="container-fluid">
        <div class="row">
            <nav class="col-md-2 d-none d-md-block bg-light sidebar">
                <div class="sidebar-sticky">
                    <ul class="nav flex-column">
                        <li class="nav-item">
                            <a class="nav-link active" href="#">
                                <span data-feather="home"></span>
                                Dashboard <span class="sr-only">(current)</span>
                            </a>
                        </li>
                        <li class="nav-item">
                            <a class="nav-link" href="#">
                                <span data-feather="file"></span>
                                Posts
                            </a>
                        </li>
                    </ul>

                    <h6 class="sidebar-heading d-flex justify-content-between align-items-center px-3 mt-4 mb-1 text-muted">
                        <span>User Management</span>
                        <a class="d-flex align-items-center text-muted" href="#">
                            <span data-feather="plus-circle"></span>
                        </a>
                    </h6>
                    <ul class="nav flex-column mb-2">
                        <li class="nav-item">
                            <a class="nav-link" href="#">
                                <span data-feather="file-text"></span>
                                Admins
                            </a>
                        </li>
                        <li class="nav-item">
                            <a class="nav-link" href="#">
                                <span data-feather="file-text"></span>
                                Logout
                            </a>
                        </li>
                    </ul>
                </div>
            </nav>

            <main role="main" class="col-md-9 ml-sm-auto col-lg-10 px-4">
                <div class="d-flex justify-content-between flex-wrap flex-md-nowrap align-items-center pt-3 pb-2 mb-3 border-bottom">
                    <h1 class="h2">Dashboard</h1>
                </div>
            </main>
        </div>
    </div>
@endsection
Let’s understand the code in the home.blade.php file. Online one we extend an app.blade.php file located in layouts folder. From line 6 to 44 we are simply defining how left side navbar of our admin dashboard will look like. From line 46 to 50 we define where our content will be placed. Remember this is just bootstrap, learn more about bootstrap 4.
The next file I want to edit is the app.blade.php file. Open resources/views/layouts/app.blade.php file and make sure it has the following code:
<!DOCTYPE html>
<html lang="{{ str_replace('_', '-', app()->getLocale()) }}">
<head>
    <meta charset="utf-8">
    <meta name="viewport" content="width=device-width, initial-scale=1">

    <!-- CSRF Token -->
    <meta name="csrf-token" content="{{ csrf_token() }}">

    <title>{{ config('app.name', 'Laravel') }}</title>

    <!-- Scripts -->
    <script src="{{ asset('js/app.js') }}" defer></script>

    <!-- Fonts -->
    <link rel="dns-prefetch" href="//fonts.gstatic.com">
    <link href="https://fonts.googleapis.com/css?family=Nunito" rel="stylesheet" type="text/css">

    <!-- Styles -->
    <link href="{{ asset('css/app.css') }}" rel="stylesheet">
    <link href="{{ asset('css/dashboard.css') }}" rel="stylesheet">
</head>
<body>
    <div id="">
        <nav class="navbar navbar-dark fixed-top bg-danger flex-md-nowrap p-0 shadow">
            <a class="navbar-brand col-sm-3 col-md-2 mr-0" href="#">Hlab Blog</a>
            <ul class="navbar-nav px-3">
                @guest
                    <li class="nav-item">
                        <a class="nav-link" href="{{ route('login') }}">{{ __('Login') }}</a>
                    </li>
                    @if (Route::has('register'))
                        <li class="nav-item">
                            <a class="nav-link" href="{{ route('register') }}">{{ __('Register') }}</a>
                        </li>
                    @endif
                @else
                    <li class="nav-item dropdown">
                        <a id="navbarDropdown" class="nav-link dropdown-toggle" href="#" role="button" data-toggle="dropdown" aria-haspopup="true" aria-expanded="false" v-pre>
                            {{ Auth::user()->name }} <span class="caret"></span>
                        </a>

                        <div class="dropdown-menu dropdown-menu-right" aria-labelledby="navbarDropdown">
                            <a class="dropdown-item" href="{{ route('logout') }}"
                               onclick="event.preventDefault();
                                                     document.getElementById('logout-form').submit();">
                                {{ __('Logout') }}
                            </a>

                            <form id="logout-form" action="{{ route('logout') }}" method="POST" style="display: none;">
                                @csrf
                            </form>
                        </div>
                    </li>
                @endguest
            </ul>
        </nav>
        <main class="py-4">
            @yield('content')
        </main>
    </div>
</body>
</html>
This is what I have done in this file, online 21 I have included dashboard.css file which is yet to be created. From line 25 to 57, I am defining our top navbar where we have our Brand name on line 26. From line 28 to 55, we are using Laravel hook called @guest which help us to check whether a user is logged in or not. If a user is not logged we display login or register link. If a user is logged we display the username and logout link.
The last thing we need to do is to create a dashboard.css file. Laravel stores

Now make sure that dashboard.css has the following code:
body {
    font-size: .875rem;
}

.feather {
    width: 16px;
    height: 16px;
    vertical-align: text-bottom;
}

/*
 * Sidebar
 */

.sidebar {
    position: fixed;
    top: 0;
    bottom: 0;
    left: 0;
    z-index: 100; /* Behind the navbar */
    padding: 48px 0 0; /* Height of navbar */
    box-shadow: inset -1px 0 0 rgba(0, 0, 0, .1);
}

.sidebar-sticky {
    position: relative;
    top: 0;
    height: calc(100vh - 48px);
    padding-top: .5rem;
    overflow-x: hidden;
    overflow-y: auto; /* Scrollable contents if viewport is shorter than content. */
}

@supports ((position: -webkit-sticky) or (position: sticky)) {
    .sidebar-sticky {
        position: -webkit-sticky;
        position: sticky;
    }
}

.sidebar .nav-link {
    font-weight: 500;
    color: #333;
}

.sidebar .nav-link .feather {
    margin-right: 4px;
    color: #999;
}

.sidebar .nav-link.active {
    color: #007bff;
}

.sidebar .nav-link:hover .feather,
.sidebar .nav-link.active .feather {
    color: inherit;
}

.sidebar-heading {
    font-size: .75rem;
    text-transform: uppercase;
}

/*
 * Content
 */

[role="main"] {
    padding-top: 133px; /* Space for fixed navbar */
}

@media (min-width: 768px) {
    [role="main"] {
        padding-top: 48px; /* Space for fixed navbar */
    }
}

/*
 * Navbar
 */

.navbar-brand {
    padding-top: .75rem;
    padding-bottom: .75rem;
    font-size: 1rem;
    background-color: rgba(0, 0, 0, .25);
    box-shadow: inset -1px 0 0 rgba(0, 0, 0, .25);
}

.navbar .form-control {
    padding: .75rem 1rem;
    border-width: 0;
    border-radius: 0;
}

.form-control-dark {
    color: #fff;
    background-color: rgba(255, 255, 255, .1);
    border-color: rgba(255, 255, 255, .1);
}

.form-control-dark:focus {
    border-color: transparent;
    box-shadow: 0 0 0 3px rgba(255, 255, 255, .25);
}
In this file, we are just defining some behaviors of how our dashboard will look and feel. To run our development server, use the following command:
php artisan serve
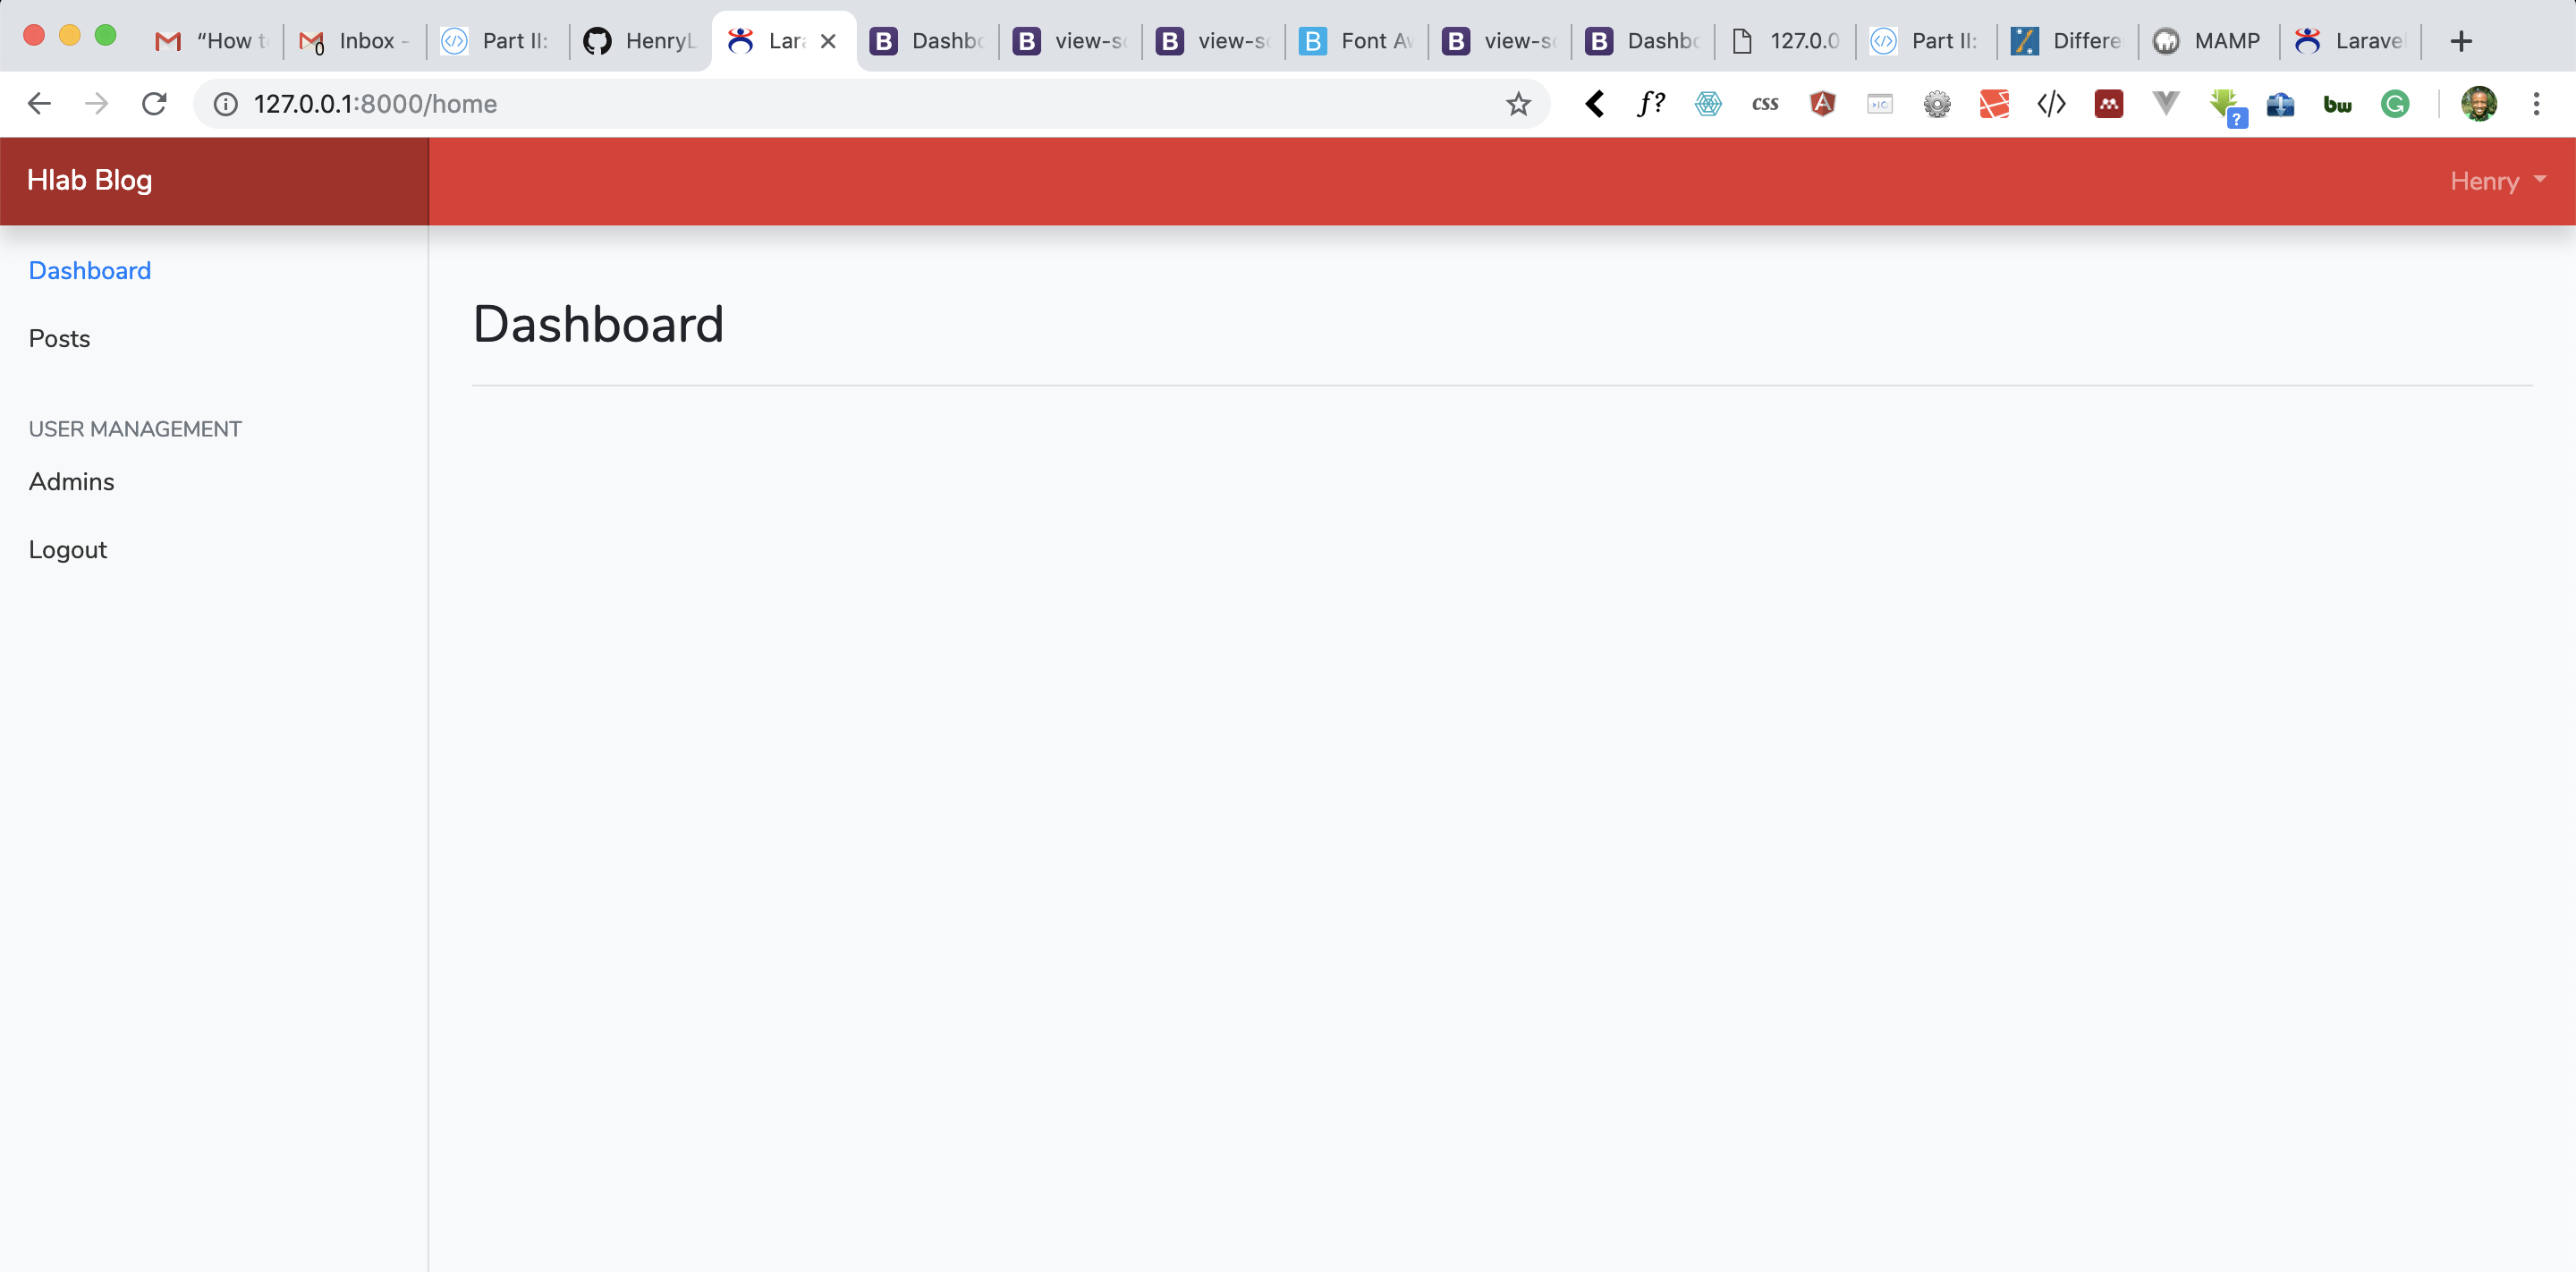
Visit the following url: http://127.0.0.1:8000/home you see the following screen:

If you have the above results great work, we will continue from here in the next lesson.
Goal Achieved in this section
- We have learnt how to locate view from a URL.
- We have learned how to include CSS.
- We have managed to change our admin dashboard
Task
Try to query and show list of registered users in our application
In the next lesson, we will continue building our blog admin portal, step by step together with you and this lesson has given us a great starting point. See you in Lesson IV
You can grab the code used in this tutorial at blog application in Laravel 5.7


Facebook Comments