Hello and welcome to this PHP/Laravel tutorial series, my name is Henry Mbugua, I will be taking you through the various aspects, and new answers of M-PESA integration using Laravel web framework and PHP 7.3. Laravel is one of the most popular PHP frameworks and can help you build an application from ground up with expressive, elegant syntax. In lesson 1, we learned how to generate M-PESA access token, in this lesson we are going to continue with our tutorial serious and we are going to learn how we can create an STK push.
STK Push Integration to M-PESA on Daraja
Lipa Na M-PESA Online payment API is used to initiate the M-PESA transaction on behalf of a customer using STK push. This is the same technique mySafaricom App uses whenever the app is used to make payments. Have a look at Safaricom App at Google play. Learn more about STK push M-PESA API.
Now that we have a brief overview of what STK push is, we are going to discuss what you need to create a successful M-PESA STK push. The following parameters are required:
- Business shortcode – this is the organization’s shortcode to receive a transaction.
- Password – password for encrypting request, which is a base64 encoding.
- Timestamp – this is the transaction timestamp, which should be in the following format yyyymmddhhiiss.
- Transaction type – M-PESA API requires developers to use the CustomerPayBillOnline type for this transaction.
- Amount – we need to pass the amount to be transacted.
- PartyA – the phone number sending the funds.
- PartyB – organization shortcode receiving the funds.
- PhoneNumber – the phone number sending the funds.
- CallBackURL – the URL response where M-PESA response will be sent.
- Account Reference – used with M-PESA paybills.
- TransactionDesc – this is the description of the transaction.
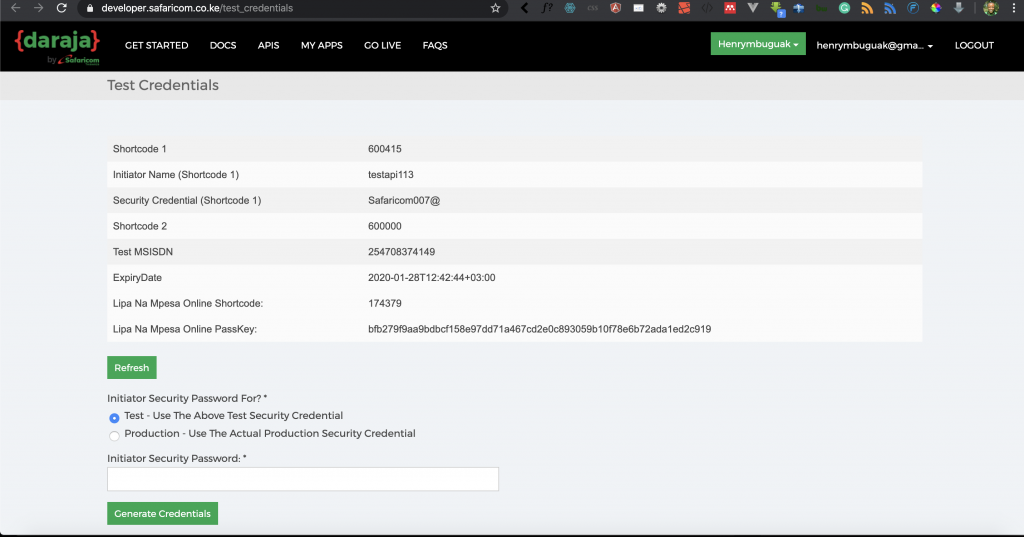
Now that we know what Lipa Na M-PESA online payment request parameters are, it is time to code. Since we will be using M-PESA sandbox, let us locate the details that we need from Safaricom Daraja, login to your M-PESA Daraja account and visit the test credentials. You will get the following screenshot,

In our Laravel application, we had created the MpesaController.php file, make sure that app/Http/Controllers/MpesaController.php has the following code:
<?php

namespace App\Http\Controllers;

use Carbon\Carbon;
use Illuminate\Http\Request;
use Illuminate\Support\Facades\Storage;

class MpesaController extends Controller
{

    /**
     * Lipa na M-PESA password
     * */

    public function lipaNaMpesaPassword()
    {
        $lipa_time = Carbon::rawParse('now')->format('YmdHms');
        $passkey = "bfb279f9aa9bdbcf158e97dd71a467cd2e0c893059b10f78e6b72ada1ed2c919";
        $BusinessShortCode = 174379;
        $timestamp =$lipa_time;

        $lipa_na_mpesa_password = base64_encode($BusinessShortCode.$passkey.$timestamp);
        return $lipa_na_mpesa_password;
    }


    /**
     * Lipa na M-PESA STK Push method
     * */

    public function customerMpesaSTKPush()
    {
        $url = 'https://sandbox.safaricom.co.ke/mpesa/stkpush/v1/processrequest';

        $curl = curl_init();
        curl_setopt($curl, CURLOPT_URL, $url);
        curl_setopt($curl, CURLOPT_HTTPHEADER, array('Content-Type:application/json','Authorization:Bearer '.$this->generateAccessToken()));


        $curl_post_data = [
            //Fill in the request parameters with valid values
            'BusinessShortCode' => 174379,
            'Password' => $this->lipaNaMpesaPassword(),
            'Timestamp' => Carbon::rawParse('now')->format('YmdHms'),
            'TransactionType' => 'CustomerPayBillOnline',
            'Amount' => 5,
            'PartyA' => 254728858889, // replace this with your phone number
            'PartyB' => 174379,
            'PhoneNumber' => 254728858889, // replace this with your phone number
            'CallBackURL' => 'https://www.blog.hlab.tech/',
            'AccountReference' => "H-lab tutorial",
            'TransactionDesc' => "Testing stk push on sandbox"
        ];

        $data_string = json_encode($curl_post_data);

        curl_setopt($curl, CURLOPT_RETURNTRANSFER, true);
        curl_setopt($curl, CURLOPT_POST, true);
        curl_setopt($curl, CURLOPT_POSTFIELDS, $data_string);

        $curl_response = curl_exec($curl);

        return $curl_response;
    }


    public function generateAccessToken()
    {
        $consumer_key="sMpgnYW62glBlxPXbyTBEGdPib8eJLOL";
        $consumer_secret="IcK2PkAFArVVVffU";
        $credentials = base64_encode($consumer_key.":".$consumer_secret);

        $url = "https://sandbox.safaricom.co.ke/oauth/v1/generate?grant_type=client_credentials";
        $curl = curl_init();
        curl_setopt($curl, CURLOPT_URL, $url);
        curl_setopt($curl, CURLOPT_HTTPHEADER, array("Authorization: Basic ".$credentials));
        curl_setopt($curl, CURLOPT_HEADER,false);
        curl_setopt($curl, CURLOPT_SSL_VERIFYPEER, false);
        curl_setopt($curl, CURLOPT_RETURNTRANSFER, true);

        $curl_response = curl_exec($curl);
        $access_token=json_decode($curl_response);
        return $access_token->access_token;
    }
}
Let us understand the code:
- From lines 16 to 25 – we created a method called lipaNaMpesaPassword () which we use to generate the password required by the M-Pesa STK push parameter.
- Line 18 – we get the current time using Carbon and format the time according to the M-Pesa requirement.
- Line 19 – we create a variable called passkey and we pass a value given to us by Safaricom in test credentials.
- Line 20 – we create a variable called business shortcode and we pass the value from M-Pesa test credentials.
- Line 21 – we just create a variable called timestamp and pass the value we get from line 18.
- Line 23 – we define a variable called Lipa na mpesa password and we concatenate our business short code, passkey, and timestamp using base64 encode.
- Line 24 – we return our generated password and that is how we generate Lipa Na M-Pesa password.
- From lines 32 to 65 –, we define a method called customerMpesaSTKPush ().
- Line 34 – we define a variable called URL and we pass Safaricom STK processing request for the test environment.
- Line 36 – we create a variable called curl and we initialize curl. To learn more about curl visit PHP curl documentation.
- Line 38 – we define our array where we use authorization keyword Bearer and we pass our access token using the generateAccessToken () method we created in lesson 1.
- From Line 41 to 54 – we define a variable called curl_post_data and pass an array of our STK push parameters that we discussed earlier. This how we pass STK push parameters. Learn more about Lipa Na Mpesa Online Payment.
- On lines 48 and 50 – replace bypassing your phone number so that we can test the STK push.
- Line 56 – we use json_encode on our request parameters.
- Line 58 to 60 – we set our curl options and we pass our request parameters.
- Line 62 – we define a variable called curl response and we execute our curl request.
- Line 64 – we return our curl response.
Now that we have our STK push method set up, the next step is to create a URL. Open routes/api.php file and make sure api.php file has the following code:
<?php

use Illuminate\Http\Request;

/*
|--------------------------------------------------------------------------
| API Routes
|--------------------------------------------------------------------------
|
| Here is where you can register API routes for your application. These
| routes are loaded by the RouteServiceProvider within a group which
| is assigned the "api" middleware group. Enjoy building your API!
|
*/

Route::middleware('auth:api')->get('/user', function (Request $request) {
    return $request->user();
});

Route::post('v1/access/token', 'MpesaController@generateAccessToken');
Route::post('v1/hlab/stk/push', 'MpesaController@customerMpesaSTKPush');
On line 21, we define our post URL for initiating our STK push. Now we are ready to test our code. Make sure your development server is running by using the following command:
php artisan serve
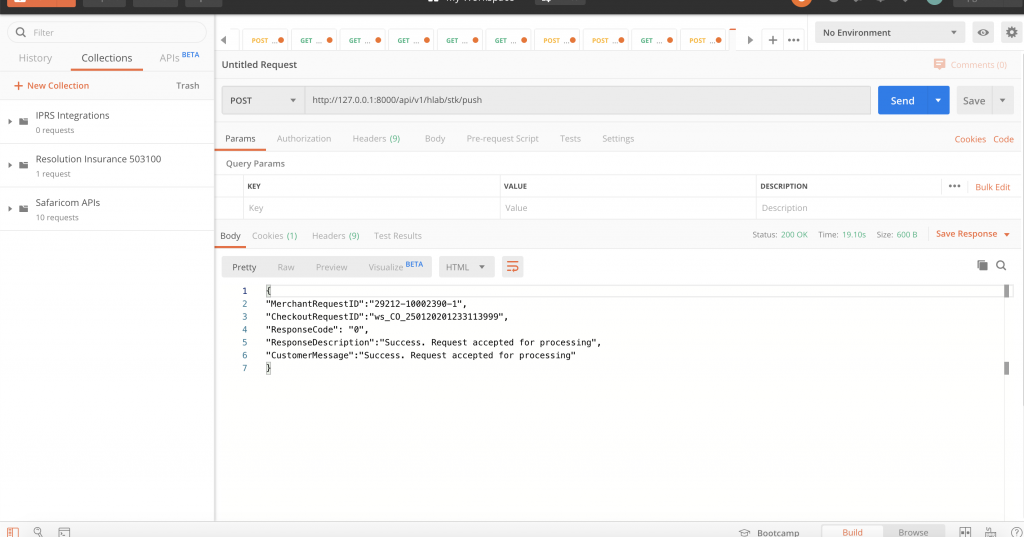
The next step is to launch postman and use the following http://127.0.0.1:8000/api/v1/hlab/stk/push and here is a screenshot of a successful STK push

We have successfully learned how to create an STK push. In our next tutorial, we are going to learn how to create C2B M-Pesa integration.
Goal Achieved in This Lesson
In this lesson, we have achieved the following:
- We have learned how to generate a Lipa Na M-PESA password.
- We have learned how to create the M-PESA STK push Integration.
With that, we conclude our lesson, to get the code associated with this lesson visit Laravel Mpesa API Integration.
The next tutorial – Lesson 3


Facebook Comments