Introduction
Hello and welcome to this tutorial, my name is Henry and I will be talking you through the various aspect of web scraping using Python 3.7 and Beautiful Soup 4. There are more than 150 million active websites today and finding relevant, comprehensive and apt information has a pivotal role to play in business, as well as search engine optimization.
What is Web Scraping?
Every website uses HTML format to display information to visitors, sometimes we find ourselves in a situation where we need to consume data from a given website but the website does not offer an API, and this is where web scrapping can help. We would describe web scraping as a technique of data mining, collecting data from web pages and storing that data in database or spreadsheet for analysis.
Use of Web Scraping
Web scraping can be applied in many fields, a good example would be the following list:
- Artificial Intelligence and machine learning
- Real Estate
- Financial markets
- Trends
- Marketing
- Brand monitoring
Is Web Scraping Legal?
Well, this is a grey area. Most website prohibit any form of data mining and since scraping is a form of data mining, then this becomes illegal. Before you scrape a site, make sure you have gone through the terms of services and privacy policy of given website. Website content is a copyright content.
Web Scraping with Python and Beautiful soup
In order for you to do web scraping you need to have an understanding of web data structure, how things are laid out, because it’s more of html and css. In this tutorial we are going to scrape my blog, We Do Not Allow Web Scraping at blog.hlab.tech
NB: Just Make Sure when you do scraping it’s not illegal.
We will be scraping the following blog:

This blog has a couple of post on it, we will scrape this blog and get the post from this website. We will get the title, link to the post, as well as the date and put them in a CSV file. We are going to create a file named blog_scraping.py file. I will be using python 3.7 on my terminal when I type:
python
I get the following screen

We will also be using Beautiful Soup which is a python library for pulling data. To install Beautiful soup, use the following command:
pip install beautifulsoup4
You get the following output:

In my case, Beautiful Soup is already installed. We will be using Pycharm as our IDE in this tutorial since we are going to make an HTTP request to our blog, we need to use a library. We are going to use python requests which is an elegant and simple HTTP library. To install python requests run the following command:
pip install requests
Here is the output of my terminal:

Am going to open blog_scraping.py file on my IDE and here is the output:

Understanding the Html Structure of Our Blog
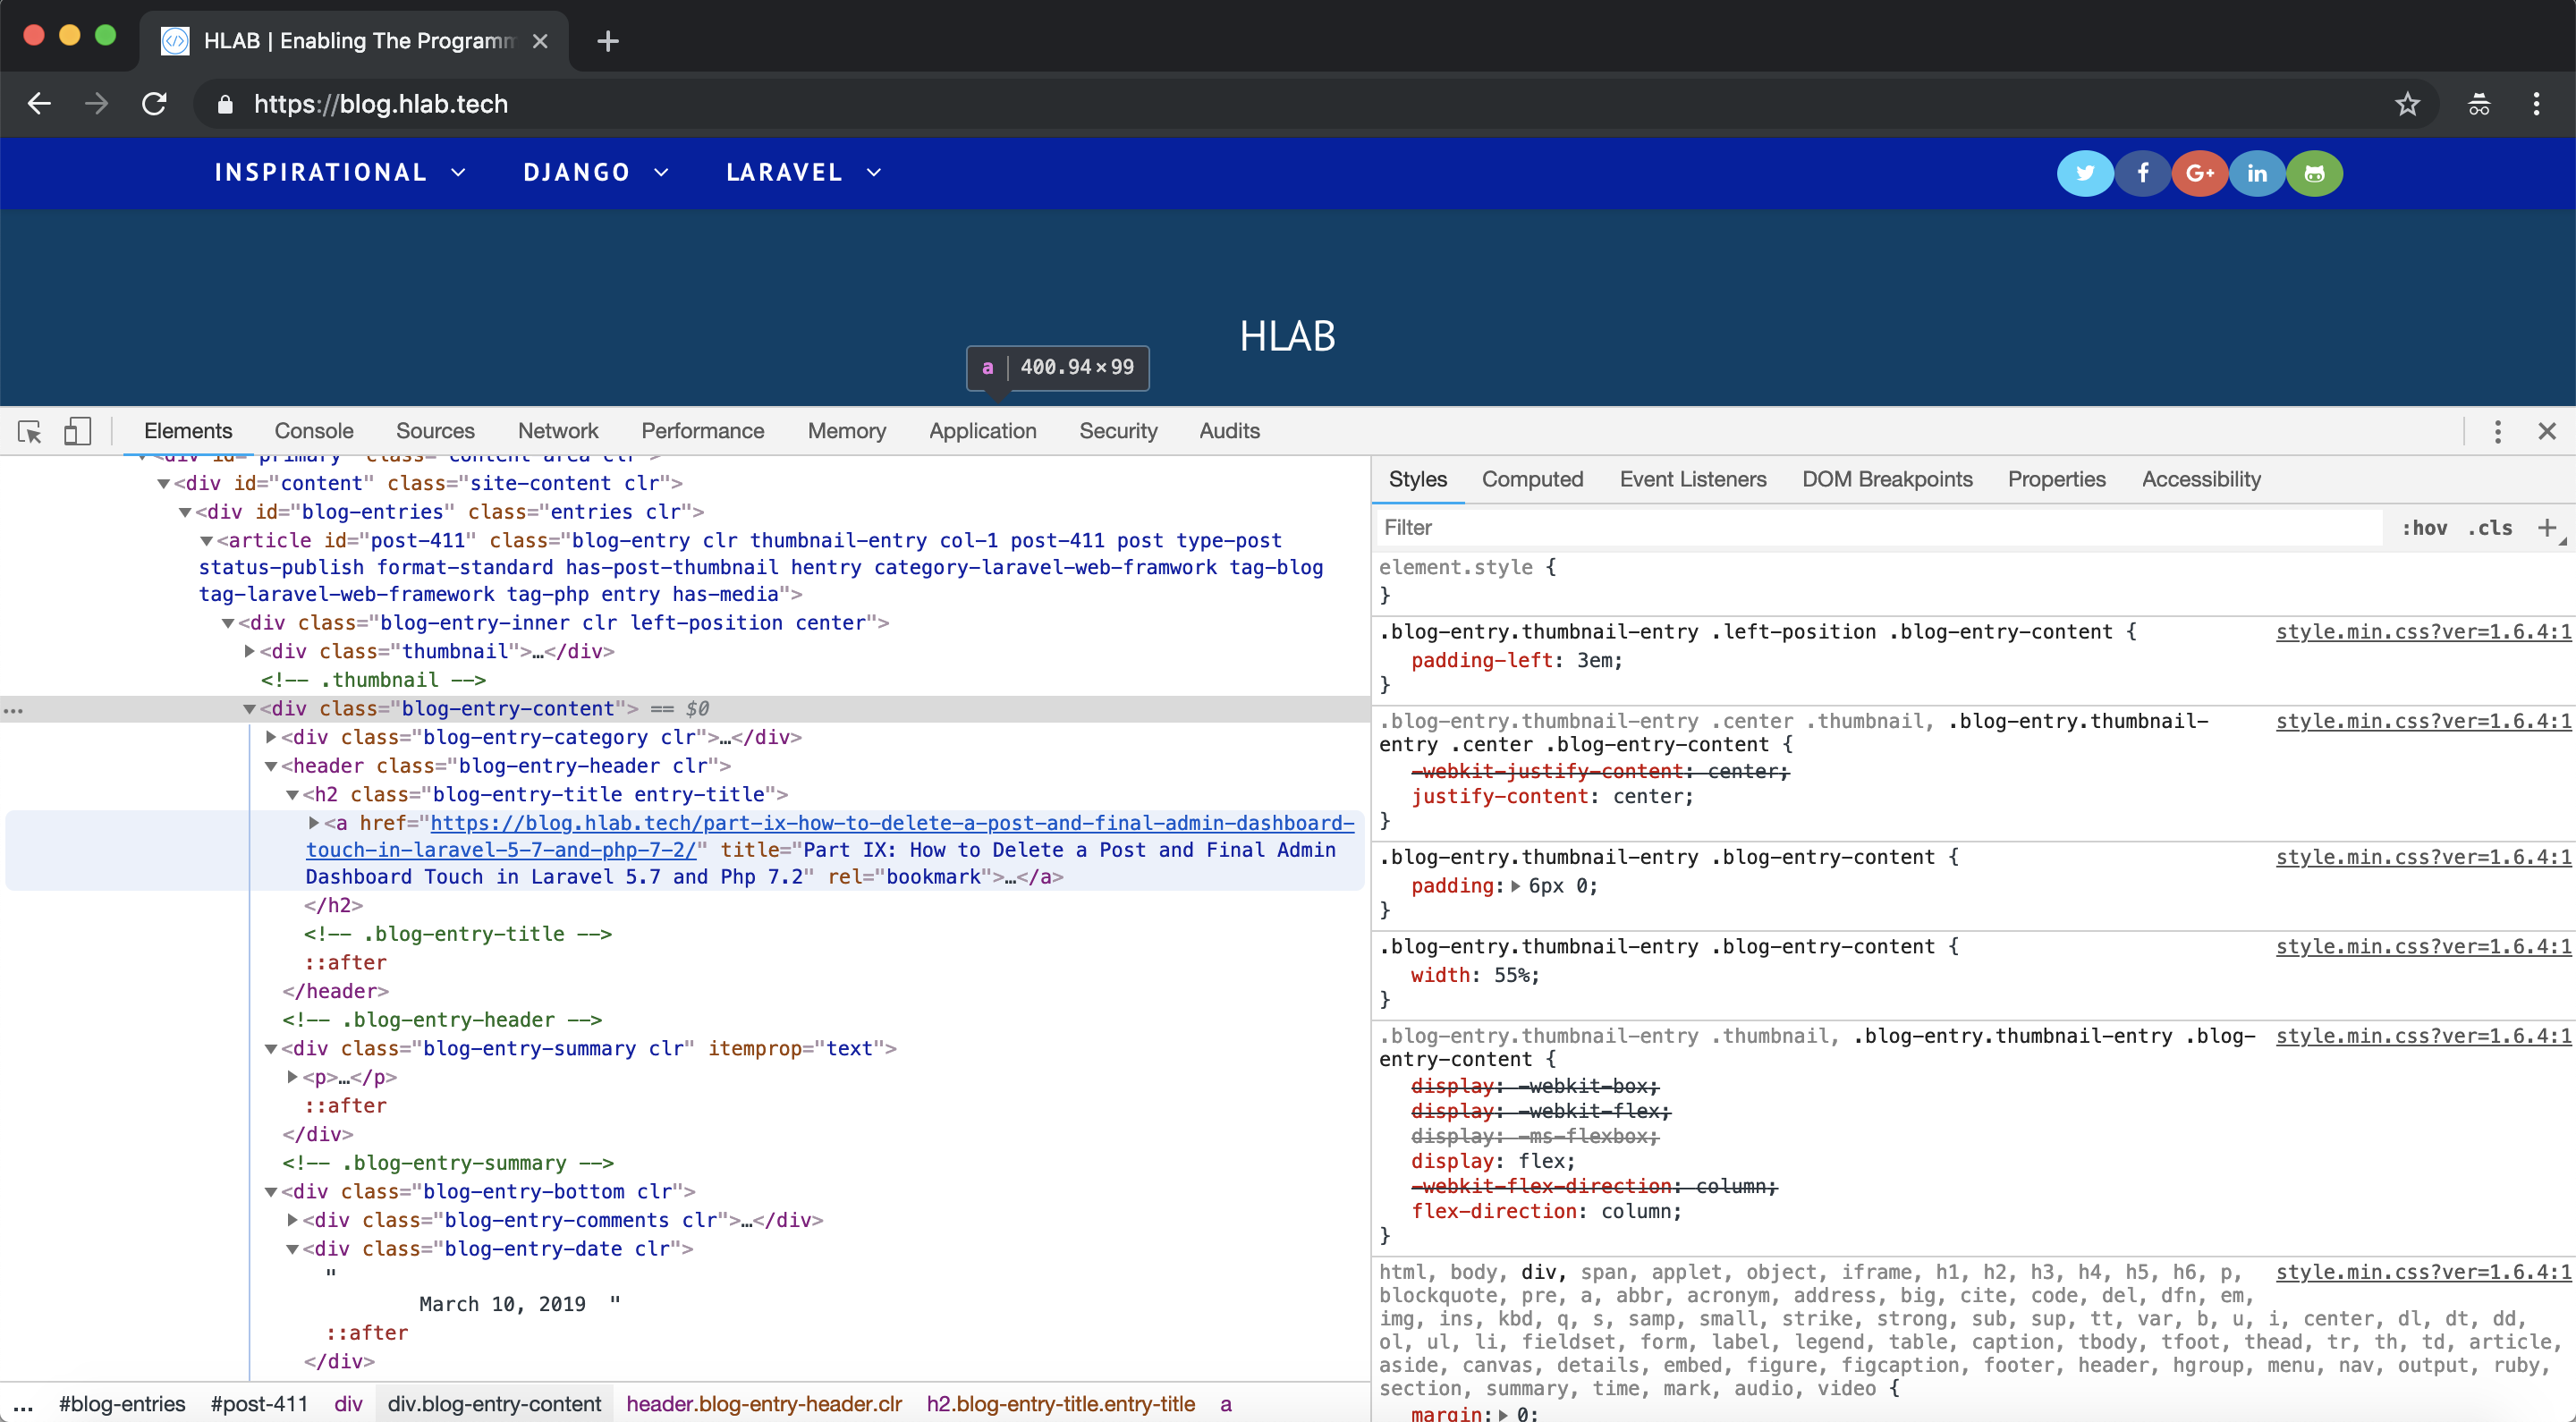
Before we can write any scraping code we need to understand the html structure of the blog, the quickest way to do that, is to inspect elements on the blog. I will navigate to blog.hlab.tech
Here is a screenshot:

In order for us to inspect the site, I will right click on a post and click on inspect. Here is a screenshot:

From our element inspection, we can tell that each post is wrapped in a div with class named blog-entry-content each title is in class called blog-entry-title entry-title and date are in class called blog-entry-date clr. Now that we have an understand of our html structure let’s scrape the site.
NB: You need knowledge of html and css of a web page you are scraping.
Make sure that blog_scraping.py has the following code:
# we import the class that we need scraping our blog

import requests
from bs4 import BeautifulSoup
from csv import writer


# we create a response variable

response = requests.get('https://www.blog.hlab.tech/')

# we initialize beautiful soup and pass in our response

soup = BeautifulSoup(response.text, 'html.parser')

# we create a variable called posts and we know that our all our blog posts are in a div called blog-entry-content

posts = soup.findAll(class_='blog-entry-content')


# writing to csv file

with open('articles.csv', 'w') as csv_file:
    csv_writer = writer(csv_file)

    # creating headers in the csv file
    headers = ['Title', 'Link', 'Date']

    # writing a row of headers in the csv
    csv_writer.writerow(headers)

    # now lets loop through our posts

    for post in posts:
        title = post.find(class_='blog-entry-title entry-title').get_text().replace('\n', '')
        link = post.find('a')['href']
        date = post.select('.blog-entry-date.clr')[0].get_text()
        csv_writer.writerow([title, link, date])
Let’s understand the code:
- Line 3 – we import requests module which will enable us to do a http request to our blog.
- Line 4 – we import BeautifulSoup module which will enable us to pull data out of our html.
- Line 5 – we import csv module which will enable us to create a comma separate values file for spreadsheet and databases import/export.
- Line 10 – we are creating a variable called response where are making a http get request to our blog.
- Line 14 – we initialize BeautifulSoup by creating a variable called soup. We also pass our response to BeautifulSoup as a web page and we pass a second parameter which is a html parser.
- Line 18 – we have created a variable called posts. This variable helps us get a list of posts which are wrapped in a css class called blog-entry-content.
- Line 23 – we are using with, a python key word which is used when working with unmanaged resources like file streams, in our case we want to create a csv file. We are creating a file called articles.csv and pass a second parameter ‘w’ which means write.
- Line 24 – we create a variable called csv_writer which we assign the writer imported from csv module. We pass our file name created on line 23 as a parameter.
- Line 27 – we create headers and we assigned a python list of strings which will act as our titles in the csv file. In our case we have title, link and date.
- Line 30 – we write a row in the csv file with our headers using a method called writerow in the csv module.
- Line 34 – we create a for loop to loop through our posts.
- Line 35 – we get the title of each post using methods provided to as by BeautifulSoup html parser.
- Line 36 – we get the link of the post.
- Line 37 – we get the date when a specific post was published.
- Line 38 – as we loop through the posts we write title link and the date of a given post.
To run our script, open terminal and run the following command:
python blog_scraping.py
The above command will create a csv file called articles.csv and here is the output. I am on Mac, so am using a program called numbers to open articles.csv

From the screenshot, we can see our headers and our post title, link and dates. Now you can import this csv file into database or do analysis in case you were scarping for analysis.
We have successfully scraped a website. Great! Hope you enjoyed this and see you next time.
You can grab the code at Learn web scraping with python 3.7 and BeautifulSoup 4.


Facebook Comments