Hello and welcome to this tutorial series, my name is Henry and I will be taking you through the various aspect of creating a simple blog system using Laravel web framework. In part IV of this tutorial series, we created our blog migration. We pick from that and learn how to run our blog migration and sync blog table in our database.
In Laravel, to run all outstanding migration, we execute the following command on terminal:
php artisan migrate

Now that we have our blog migration already synced with our database. It’s time to implement our ability to create blog post through our admin dashboard. To keep it simple, we are going to use our HomeController. Open HomeController and make sure it has the following code:
<?php

namespace App\Http\Controllers;

use App\User;
use Illuminate\Http\Request;

class HomeController extends Controller
{
    /**
     * Create a new controller instance.
     *
     * @return void
     */
    public function __construct()
    {
        $this->middleware('auth');
    }

    /**
     * Show the application dashboard.
     *
     * @return \Illuminate\Contracts\Support\Renderable
     */
    public function index()
    {
        return view('home');
    }

    public function getRegisteredUsers()
    {
        $users = User::orderBy('id', 'DESC')->get();
        return view('users', ['users' => $users]);
    }


    /**
     * A function to show a list of all blog posts
     */

    public function PostList()
    {
        return view('post_list');
    }

}
Let’s understand the code:
- From line 41 to 44, we have created a function called PostList.
- Line 43, we return a view called post_list. We have not created this view yet.
Now let’s create a post_list.blade.php view in our resources/views folder. Here is the folder structure.

Make sure that post_list.blade.php file has the following code:
@extends('layouts.app')

@section('content')
    <div class="container-fluid">
        <div class="row">
            @include('partials.sidenavbar')

            <main role="main" class="col-md-9 ml-sm-auto col-lg-10 px-4">
                <div class="d-flex justify-content-between flex-wrap flex-md-nowrap align-items-center pt-3 pb-2 mb-3 border-bottom">
                    <h1 class="h2">All Posts

                    </h1>
                    <a href="" class="btn btn-primary float-right">Add Post</a>
                </div>
            </main>
        </div>
    </div>
@endsection
Let’s understand the code:
- Line 1 – We extend our app.blade.php to maintain the same look and feel in our dashboard.
- From 3 to 17, we create our content area.
- From 10 to 12, we have created a title called All posts and also a button for adding the post. This is just bootstrap.
The next thing we need to do is to edit web.php file located in routes/ folder. Make sure that web.php file has the following code.
<?php

/*
|--------------------------------------------------------------------------
| Web Routes
|--------------------------------------------------------------------------
|
| Here is where you can register web routes for your application. These
| routes are loaded by the RouteServiceProvider within a group which
| contains the "web" middleware group. Now create something great!
|
*/

Route::get('/', function () {
    return view('welcome');
});

Auth::routes();

Route::get('/home', 'HomeController@index')->name('home');
Route::get('/registered/users', 'HomeController@getRegisteredUsers')->name('registered_users');
Route::get('/all/posts', 'HomeController@PostList')->name('all_posts');
Let’s understand the code:
- Line 22, we have created a route named all_posts which goes to our PostList method in our HomeController.
The last thing we need to do is to update our sidenavbar.blade.php file located at resources/views/partials folder make our sidenavbar.blade.php has the following code:
<nav class="col-md-2 d-none d-md-block bg-light sidebar">
    <div class="sidebar-sticky">
        <ul class="nav flex-column">
            <li class="nav-item">
                <a class="nav-link active" href="#">
                    <span data-feather="home"></span>
                    Dashboard <span class="sr-only">(current)</span>
                </a>
            </li>
            <li class="nav-item">
                <a class="nav-link" href="{{ route('all_posts') }}">
                    <span data-feather="file"></span>
                    Posts
                </a>
            </li>
        </ul>

        <h6 class="sidebar-heading d-flex justify-content-between align-items-center px-3 mt-4 mb-1 text-muted">
            <span>User Management</span>
            <a class="d-flex align-items-center text-muted" href="#">
                <span data-feather="plus-circle"></span>
            </a>
        </h6>
        <ul class="nav flex-column mb-2">
            <li class="nav-item">
                <a class="nav-link" href="{{ route('registered_users') }}">
                    <span data-feather="file-text"></span>
                    Admins
                </a>
            </li>
            <li class="nav-item">
                <a class="nav-link" href="#">
                    <span data-feather="file-text"></span>
                    Logout
                </a>
            </li>
        </ul>
    </div>
</nav>
Let’s understand the code:
- On line 11, we have hooked our route in href attribute to make sure when you click on Posts in our dashboard our PostList method is called.
Time to test our code – make sure your development server is running and login to your dashboard. When login to your dashboard and click on Posts on the left side navbar. You should see the following:

Creating Post
In order for us to create a post, we need a form. The next thing we need to do is to create a form that our admin can use to create the post. Open our HomeController and make sure it has the following code:
<?php

namespace App\Http\Controllers;

use App\User;
use Illuminate\Http\Request;

class HomeController extends Controller
{
    /**
     * Create a new controller instance.
     *
     * @return void
     */
    public function __construct()
    {
        $this->middleware('auth');
    }

    /**
     * Show the application dashboard.
     *
     * @return \Illuminate\Contracts\Support\Renderable
     */
    public function index()
    {
        return view('home');
    }

    public function getRegisteredUsers()
    {
        $users = User::orderBy('id', 'DESC')->get();
        return view('users', ['users' => $users]);
    }


    /**
     * A function to show a list of all blog posts
     */

    public function PostList()
    {
        return view('post_list');
    }


    /**
     * A function to show a form to create post
     */

    public function createPost()
    {
        return view('post_create');
    }

}
Let’s understand the code:
- From line 51 to 54, we have created a function called createPost.
- Line 53, we return a view called post_create. Now let’s create that view in resources/views/ folder.
After creating post_create.blade.php, here is the folder structure:

Make sure that post_create.blade.php has the following code:
@extends('layouts.app')

@section('content')
    <div class="container-fluid">
        <div class="row">
            @include('partials.sidenavbar')

            <main role="main" class="col-md-9 ml-sm-auto col-lg-10 px-4">
                <div class="d-flex justify-content-between flex-wrap flex-md-nowrap align-items-center pt-3 pb-2 mb-3 border-bottom">
                    <h1 class="h2">Create A Post</h1>
                </div>


                    <form action="" method="post">
                        <div class="form-group">
                            <label for="title">Title</label>
                            <input type="text" class="form-control"  aria-describedby="emailHelp" placeholder="Enter blog title" name="title" required>
                        </div>
                        <div class="form-group">
                            <label for="body">Blog Content</label>
                            <textarea class="form-control" rows="5" name="body" required></textarea>
                        </div>
                        <button type="submit" class="btn btn-primary">Create Post</button>
                    </form>

            </main>
        </div>
    </div>
@endsection
Let’s understand the code:
- Line 1 – we extend our app.blade.php file.
- From line 14 to 24, we have created a form that captures the blog title and the content of the post.
- Line 17 – we have an input field to get the title. Take note that it has an attribute called name. All form input must have name.
- Line 21 – to capture the content of our post. We use text area.
- Line 23 – we have create post button.
Open web.php file and make sure it has the following code:
<?php

/*
|--------------------------------------------------------------------------
| Web Routes
|--------------------------------------------------------------------------
|
| Here is where you can register web routes for your application. These
| routes are loaded by the RouteServiceProvider within a group which
| contains the "web" middleware group. Now create something great!
|
*/

Route::get('/', function () {
    return view('welcome');
});

Auth::routes();

Route::get('/home', 'HomeController@index')->name('home');
Route::get('/registered/users', 'HomeController@getRegisteredUsers')->name('registered_users');
Route::get('/all/posts', 'HomeController@PostList')->name('all_posts');
Route::get('/create/post', 'HomeController@createPost')->name('create_post');
Line 23 – we have created a web route named create_post that goes to our createPost method in our HomeController. Let’s update our post_list.blade.php to make sure it has the following code:
@extends('layouts.app')

@section('content')
    <div class="container-fluid">
        <div class="row">
            @include('partials.sidenavbar')

            <main role="main" class="col-md-9 ml-sm-auto col-lg-10 px-4">
                <div class="d-flex justify-content-between flex-wrap flex-md-nowrap align-items-center pt-3 pb-2 mb-3 border-bottom">
                    <h1 class="h2">All Posts

                    </h1>
                    <a href="{{ route('create_post') }}" class="btn btn-primary float-right">Add Post</a>
                </div>
            </main>
        </div>
    </div>
@endsection
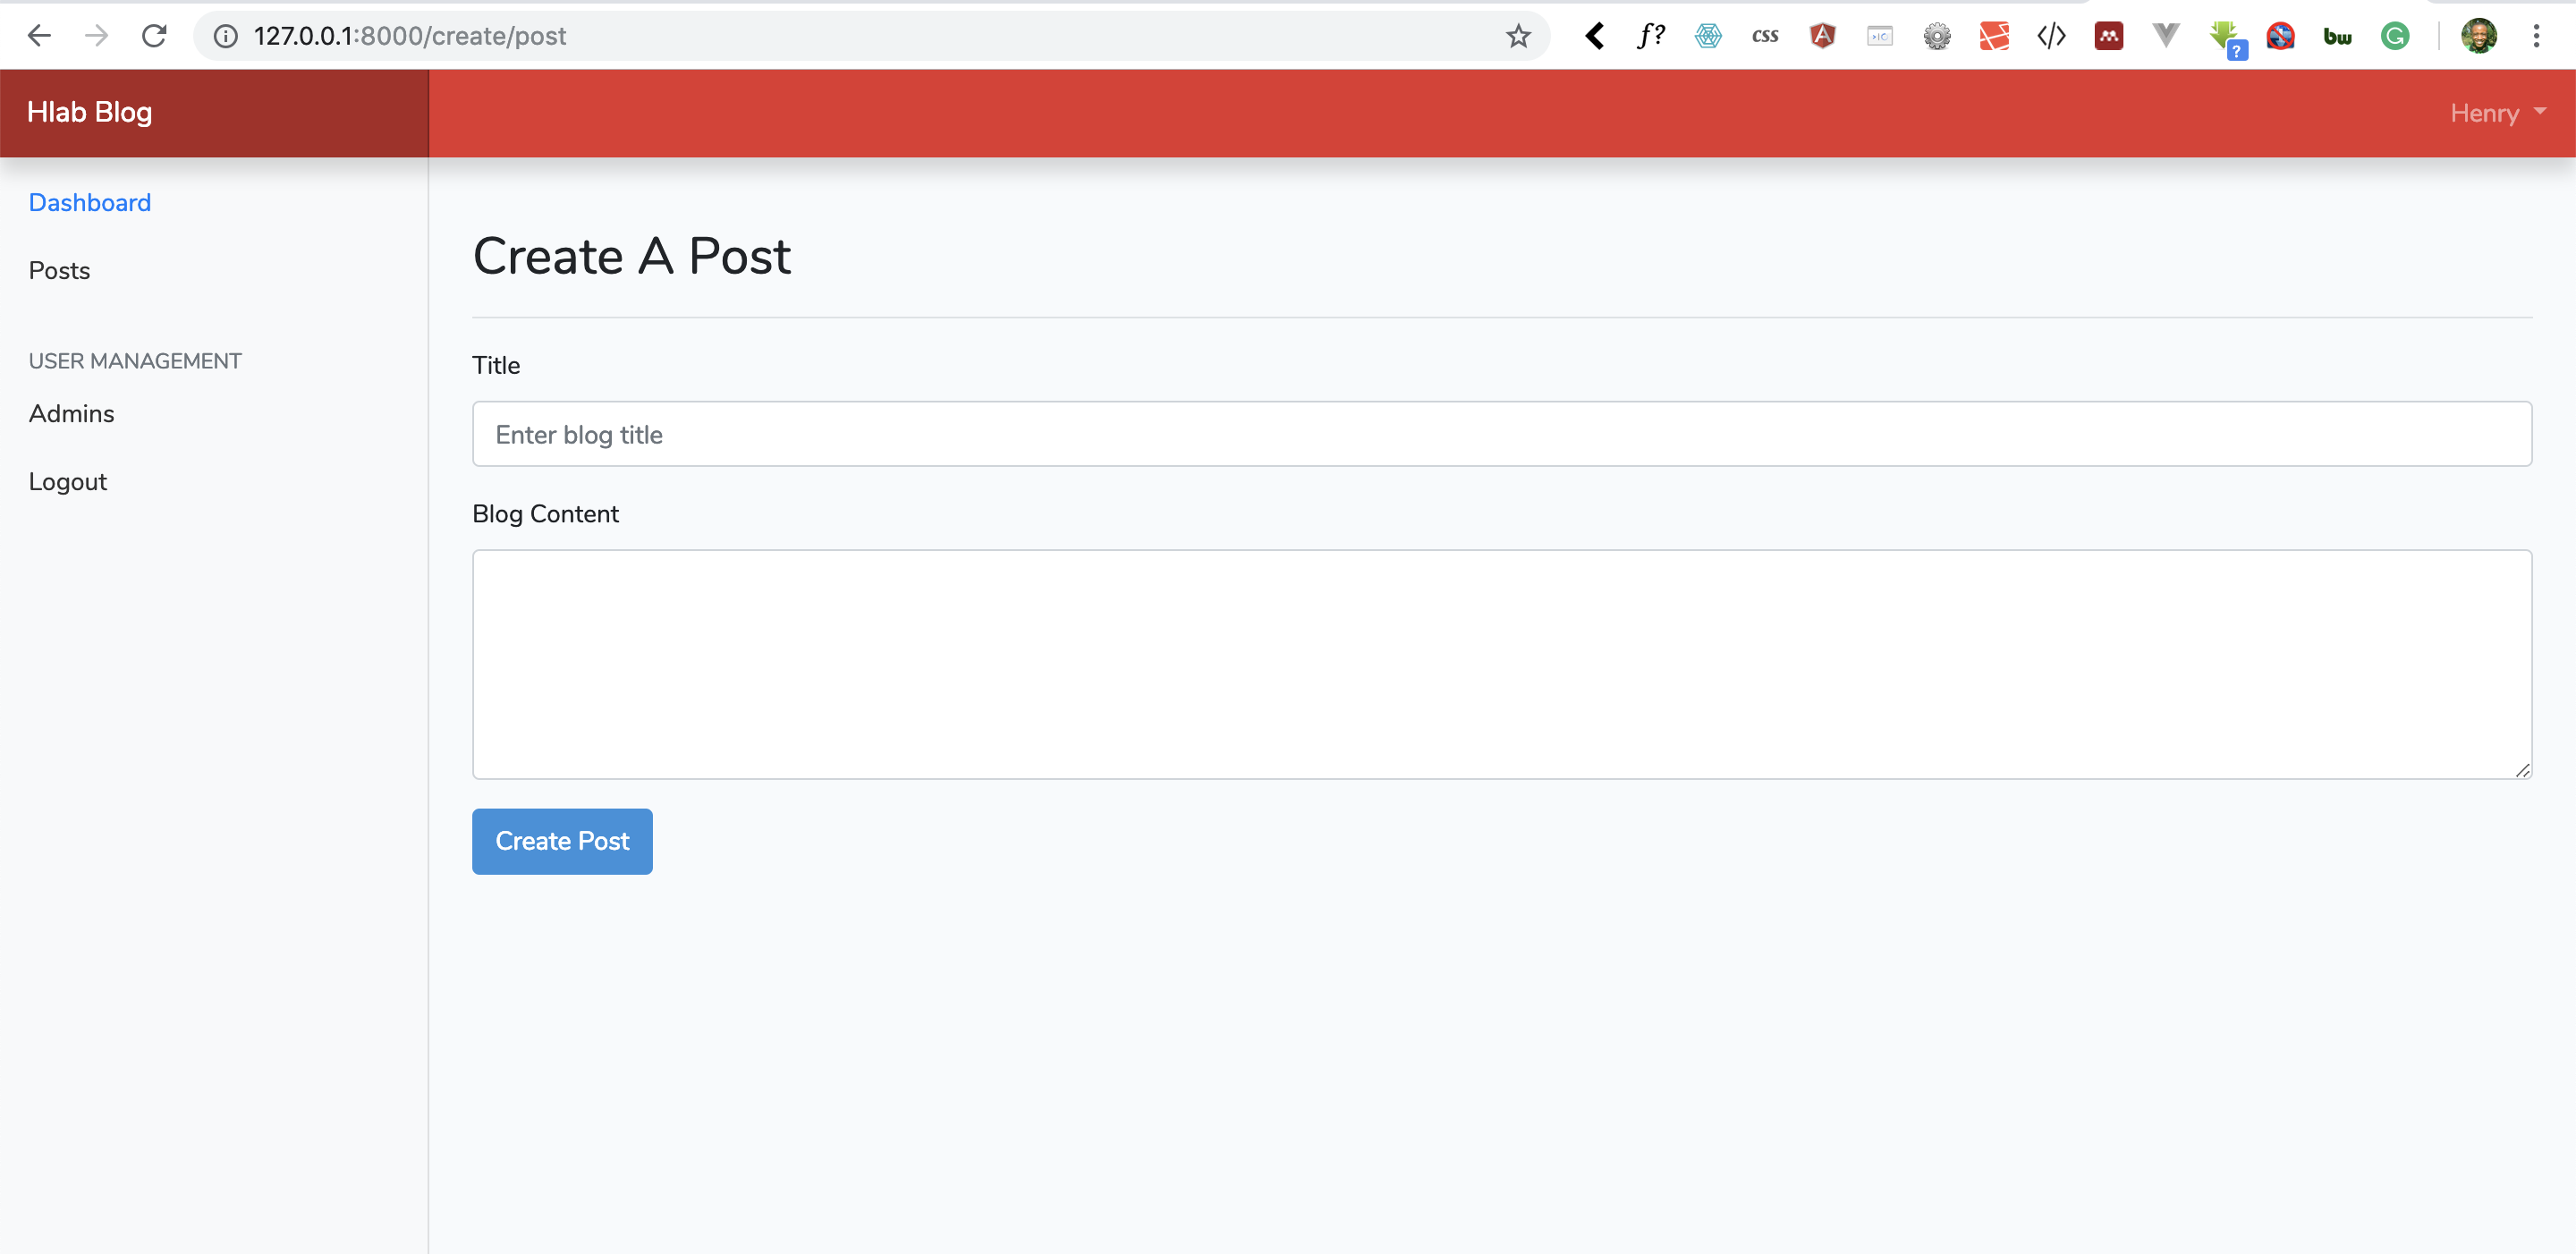
Line 13 – we have added the route to call our createPost method. Go to your dashboard and reload the page. Once you reload click on the Add Post button. You should see the following:

Phew! That was a lot of work. We are going to stop there for this lesson.
Goal Achieved
- We have learnt how to run outstanding migration in Laravel.
- We have created post list page in our dashboard.
- We have created a form to create our post.
Task
How to submit and save form data in Laravel. Here is link to help.
In the next lesson, we will continue building our blog admin portal, step by step together with you and this lesson has given us a great starting point. See you in Lesson VI
You can grab the code used in this tutorial at blog application in Laravel 5.7


Facebook Comments